Easy No-Bake Patriotic Cheesecake Recipe
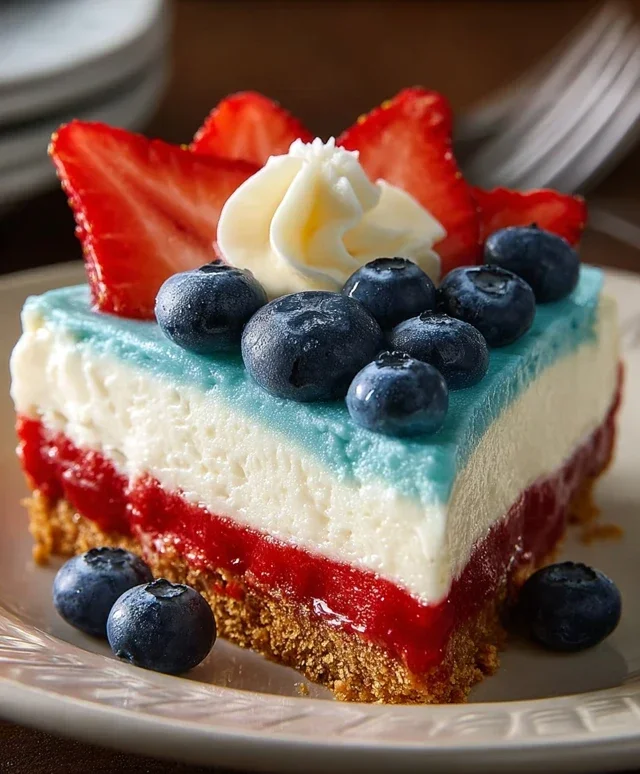
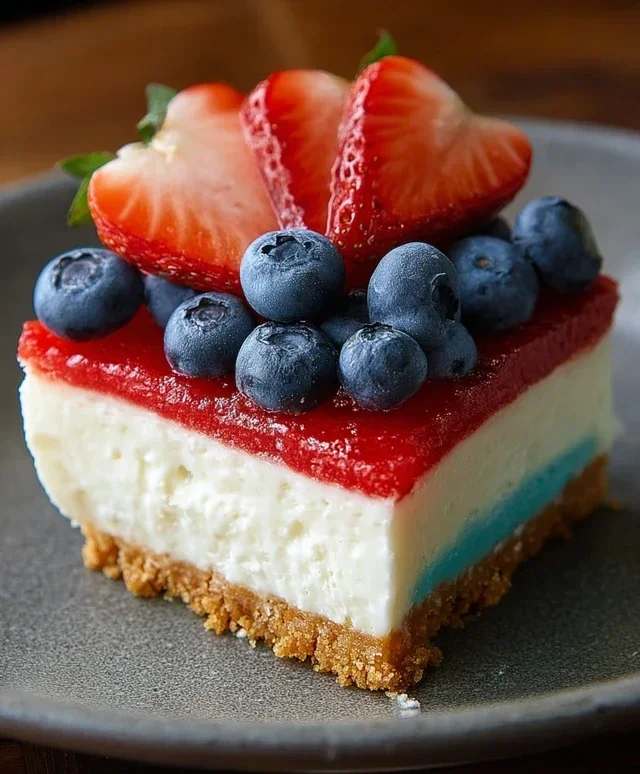
No Bake Patriotic Cheesecake is the ultimate showstopper for any summer celebration, and I’m so excited to share this recipe with you! Imagin extracte a creamy, dreamy dessert that’s as beautiful as it is delicious, perfect for grilling holidays, backyard BBQs, or simply a festive treat. What makes this No Bake Patriotic Cheesecake so incredibly loved? It’s the sheer simplicity combined with an unforgettable visual appeal. We’re talking layers of vibrant red, white, and blue that create a stunning edible flag, all without the fuss of preheating your oven. This recipe is a lifesaver when you want a show-stopping dessert that’s remarkably easy to make and always a crowd-pleaser. Get ready to impress your friends and family with this simple yet spectacular No Bake Patriotic Cheesecake!
No Bake Patriotic Cheesecake
Get ready to celebrate your favorite holidays with a dessert that’s as dazzling as the fireworks themselves! This No Bake Patriotic Cheesecake is the perfect showstopper for Memorial Day, the Fourth of July, or any summer gathering where you want to add a splash of red, white, and blue. It’s incredibly easy to make, requiring no oven time, which is a lifesaver on hot days. The creamy cheesecake filling, delightful crust, and vibrant layers create a visually stunning and delicious treat that everyone will rave about. Plus, the “no-bake” aspect means less stress and more time to enjoy your guests. Let’s dive into creating this masterpiece!
Ingredients:
Instructions:
Preparing the Golden Oreo Crust
The foundation of any great cheesecake is its crust, and this one is a delightful twist on the classic. We’ll start by creating a sweet and buttery crust using golden Oreos. First, take your 2 cups of golden Oreo crum extractbs. You can achieve this by pulsing whole golden Oreos in a food processor until they resemble fine crum extractbs, or by placing them in a zip-top bag and crushing them with a rolling pin until you have your desired texture. In a medium bowl, combine the golden Oreo crum extractbs with 3 tablespoons of melted butter and 1/4 teaspoon of salt. The salt might seem like a small addition, but it really helps to balance the sweetness and enhance the overall flavor of the crust. Stir everything together until the crum extractbs are evenly moistened and clump together when squeezed. This ensures your crust will hold its shape beautifully.
Now, it’s time to press the crust into your pie plate or springform pan. I find a 9-inch pie plate works wonderfully, but a springform pan makes for an even easier release of the cheesecake. Gently press the crum extractb mixture evenly into the bottom and slightly up the sides of your chosen pan. You can use the bottom of a measuring cup or a flat-bottomed glass to help you get a nice, compact layer. A firm crust will prevent the cheesecake from crum extractbling when you slice it. Once pressed, place the crust in the refrigerator to chill while you prepare the filling. This chilling time is crucial as it allows the butter to firm up, creating a sturdy base.
Creating the Red Layer
This is where the patriotic magic begin extracts to unfold! We’ll divide our cheesecake filling to create distinct red and white layers. In a large bowl, beat the 2 packages (8 oz each) of softened cream cheese until it’s completely smooth and creamy. It’s important that your cream cheese is truly softened, at room temperature, to avoid any lumps in your filling. Next, gradually add 2 cups of powdered sugar to the cream cheese, beating until well combined and smooth. Scrape down the sides of the bowl periodically to ensure everything is incorporated. Stir in 2 teaspoons of vanilla extract for that classic cheesecake flavor.
In a separate bowl, whip 2 cups of heavy whipping cream until stiff peaks form. Be careful not to overmix, or you’ll end up with butter! Gently fold about a third of the whipped cream into the cream cheese mixture to lighten it. Then, carefully fold in the remaining whipped cream until just combined. Don’t overmix at this stage either; we want to maintain that airy, fluffy texture.
Now, it’s time to add the color. Take about half of this glorious cheesecake batter and place it into another bowl. Add 1 teaspoon of red gel food color to this portion. Gel food coloring is best because it provides intense color without adding too much liquid. Stir gently until you achieve a vibrant, uniform red hue.
Assembling the Red and White Layers
With your crust chilled and your batters ready, we can start building our patriotic masterpiece. Carefully spoon the red cheesecake batter over the chilled golden Oreo crust. Try to spread it as evenly as possible, creating a beautiful red base. Next, spoon the remaining plain (white) cheesecake batter over the red layer. Again, spread it gently and evenly. At this point, you’ll have a lovely two-toned effect. Don’t worry if the layers aren’t perfectly distinct; a little marbling can be quite pretty. Place the cheesecake in the refrigerator to chill for at least 4 hours, or preferably overnight, until it’s firm. This is the longest wait, but it’s absolutely essential for the cheesecake to set properly.
Crafting the Blue Raspberry Jell-O Layer
For the final, dazzling blue layer, we’ll use a flavored Jell-O mixture. In a heatproof bowl, combine the 1 package (3.94 oz) of blue raspberry Jell-O with 1 cup of boiling water. Stir until the Jell-O powder is completely dissolved. Let this mixture cool to room temperature, which is important. If it’s too hot, it could melt the cheesecake layers. This cooling process can take about 30-45 minutes. Once cooled, you can carefully pour this blue Jell-O mixture over the chilled cheesecake. Make sure your cheesecake is firm before adding the Jell-O layer. Pour it slowly to avoid disturbing the layers beneath. Return the cheesecake to the refrigerator and chill for another 2-3 hours, or until the Jell-O layer is completely set.
The Optional White Chocolate Glaze and Finishing Touches
For an extra touch of decadence and a smooth, finished look, you can create a simple white chocolate glaze. In a medium bowl, beat 6 oz of softened cream cheese with 6 tablespoons of softened butter until smooth. Gradually beat in 3 cups of powdered sugar and 1 teaspoon of vanilla extract until you have a creamy, pipeable consistency. If it’s too thick, you can add a tablespoon of milk at a time. This glaze is optional, but it adds a lovely richness and a bright white contrast.
Once the Jell-O is set, you can either spread this white chocolate glaze over the blue Jell-O layer, or pipe decorative swirls. Finally, for the ultimate patriotic flourish, scatter fresh blueberries over the white glaze or directly onto the blue Jell-O layer. The vibrant blue of the blueberries perfectly complements the red and white, completing your stunning no-bake patriotic cheesecake. Slice and serve this festive dessert with pride! Enjoy the cheers it’s sure to inspire.
Conclusion:
And there you have it! Your delicious and impressively easy No Bake Patriotic Cheesecake is ready to wow your guests. This recipe truly shines because it delivers all the creamy, dreamy flavor of traditional cheesecake without the fuss of baking. It’s the perfect centerpiece for any summer gathering, Fourth of July celebration, or even just a patriotic craving! The vibrant layers are as delightful to look at as they are to eat, making it a guaranteed crowd-pleaser. I love serving this chilled and sliced, letting those beautiful colors speak for themselves. For a little extra flair, consider a dollop of fresh whipped cream and a sprinkle of fresh berries on top.
Don’t be afraid to get creative with variations! You could easily swap out the berry layers for other red and blue fruits like raspberries or blueberries, or even add a white chocolate drizzle for extra decadence. This No Bake Patriotic Cheesecake is so forgiving and adaptable, making it an excellent recipe for bakers of all skill levels. So please, give it a try – you won’t regret the simplicity and the spectacular results!
Frequently Asked Questions:
How long does this No Bake Patriotic Cheesecake need to chill?
For the best set and flavor, I recommend chilling your cheesecake for at least 6-8 hours, or preferably overnight. This allows the cream cheese mixture to firm up properly and the flavors to meld together beautifully.
Can I make this cheesecake ahead of time?
Absolutely! This No Bake Patriotic Cheesecake is perfect for making ahead. In fact, I find it tastes even better after a full day of chilling. Just cover it tightly with plastic wrap once it’s fully set and store it in the refrigerator.
What if I don’t have grabeef ham crackers?
No worries! You can easily substitute grabeef ham crackers with other crushed cookies for the crust. Vanilla wafers, shortbread cookies, or even gin extractgersnap cookies would work wonderfully and add a unique twist to your No Bake Patriotic Cheesecake.
No Bake Patriotic Cheesecake
A festive and easy no-bake cheesecake with red, white, and blue layers, perfect for celebrations.
Ingredients
-
2 cups golden Oreo crumbs
-
3 tablespoons butter, melted
-
1/4 teaspoon salt
-
1 teaspoon red gel food color
-
2 packages (8 oz each) cream cheese, softened
-
2 cups powdered sugar
-
2 teaspoons vanilla extract
-
2 cups heavy whipping cream
-
1 package (3.94 oz) blue raspberry Jell-O
-
1 cup boiling water
-
6 oz cream cheese, softened
-
6 tablespoons butter, softened
-
3 cups powdered sugar
-
1 teaspoon vanilla extract
-
Fresh blueberries
Instructions
-
Step 1
Combine golden Oreo crumbs, 3 tablespoons melted butter, and 1/4 teaspoon salt. Press firmly into the bottom of a 9-inch springform pan. -
Step 2
In a large bowl, beat 2 packages (8 oz each) softened cream cheese, 2 cups powdered sugar, and 2 teaspoons vanilla extract until smooth. -
Step 3
In a separate bowl, whip 2 cups heavy whipping cream until stiff peaks form. Gently fold into the cream cheese mixture. -
Step 4
Divide the cream cheese mixture into three portions. Add 1 teaspoon red gel food color to one portion and mix well. Leave one portion plain for the white layer. Dissolve blue raspberry Jell-O in 1 cup boiling water, let cool slightly, then stir into the third portion of cream cheese mixture. -
Step 5
Carefully layer the cheesecake mixture: spread the red layer over the crust, followed by the plain white layer, and then the blue layer. Chill for at least 4 hours, or until firm. -
Step 6
For the frosting: beat 6 oz softened cream cheese and 6 tablespoons softened butter until smooth. Gradually beat in 3 cups powdered sugar and 1 teaspoon vanilla extract until creamy. Frost the chilled cheesecake. -
Step 7
Decorate with fresh blueberries before serving.
Important Information
Nutrition Facts (Per Serving)
It is important to consider this information as approximate and not to use it as definitive health advice.
Allergy Information
Please check ingredients for potential allergens and consult a health professional if in doubt.