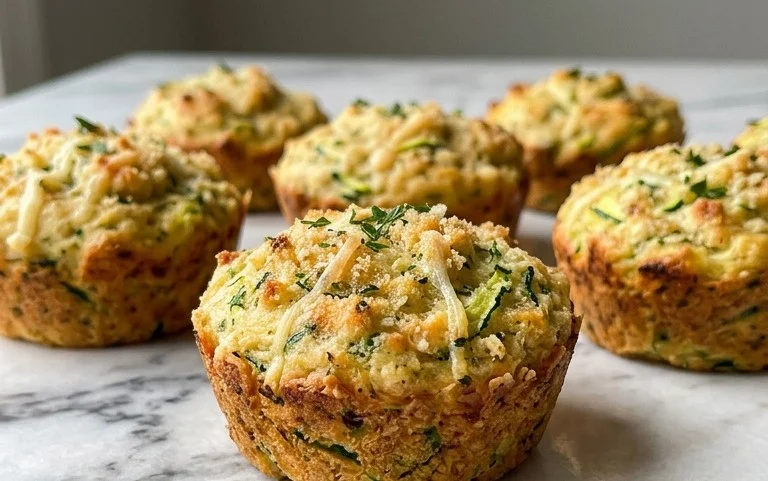
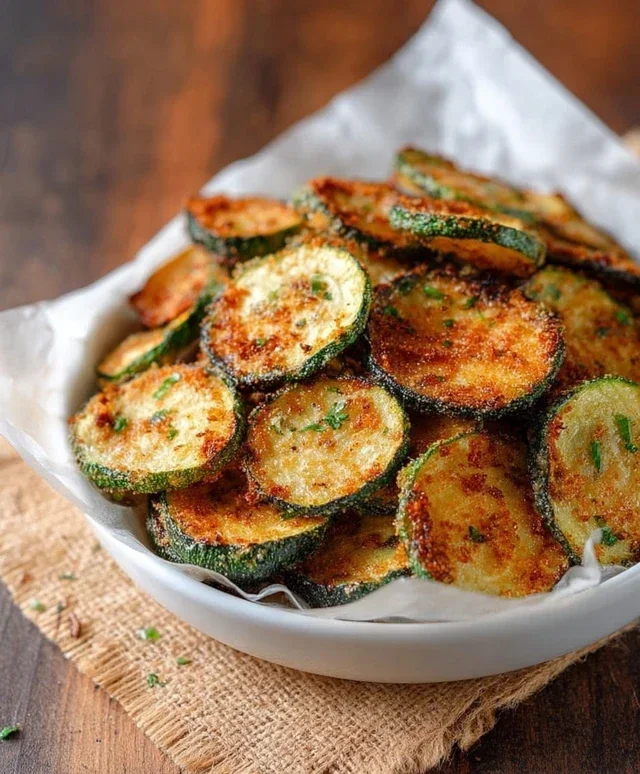
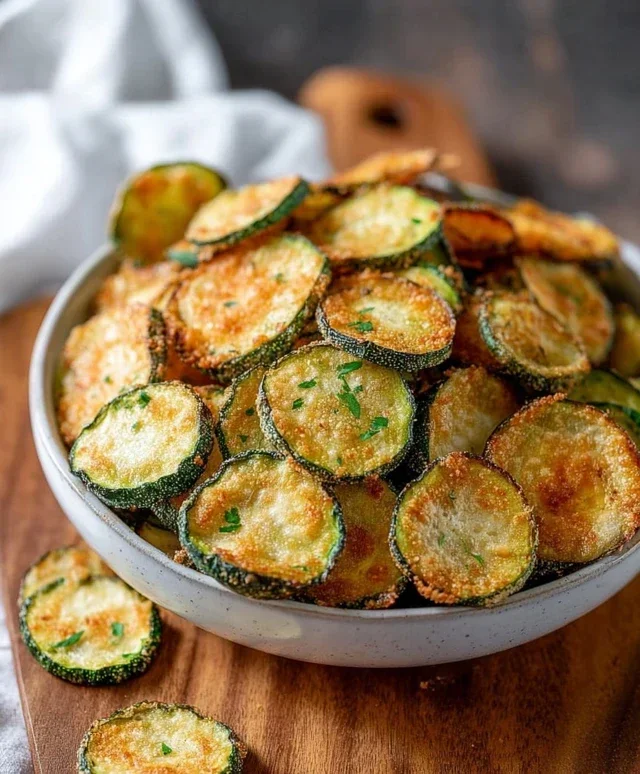
Crispy Zucchini Chips Recipe- Easy & Delicious
Crispy zucchini chips are about to become your new favorite snack obsession. Forget those greasy, store-bought alternatives; we’re talking about vibrant, incredibly satisfying bites that deliver a satisfying crunch with every mouthful. What’s not to love? They’re a fantastic way to use up an abundance of summer squash, transforming humble zucchini into something truly spectacular. The magic of these crispy zucchini chips lies in their simplicity and the pure joy of that perfect, delicate crisp. They’re naturally gluten-free and a healthier alternative to potato chips, making them a guilt-free indulgence you can feel good about sharing (or keeping all to yourself!). Get ready to discover just how delightful a few simple ingredients can become.
Crispy Zucchini Chips
There’s something incredibly satisfying about a perfectly crispy chip, and the fact that you can achieve this delightful crunch with a humble vegetable like zucchini is nothing short of culinary magic. Forget those greasy, processed snacks; these homemade crispy zucchini chips are a revelation. They’re surprisingly easy to make, packed with flavor, and a fantastic way to sneak some extra veggies into your day. I love making these as an appetizer for gatherings, or just as a healthy afternoon snack when I’m craving something savory. The key to achieving that coveted crispiness lies in a few simple techniques, and once you nail it, you’ll be making these over and over again.
Ingredients:
Cooking Instructions
Preparation is Key
The first and most crucial step in achieving perfectly crispy zucchini chips is proper preparation. This involves slicing the zucchini thinly and ensuring they are as dry as possible.
1. Slice the Zucchinis: Begin extract by washing your zucchinis thoroughly. Trim off the ends. The best way to slice the zucchini for chips is to use a mandoline slicer. This will ensure uniform, paper-thin slices, which is essential for even cooking and crisping. If you don’t have a mandoline, a very sharp knife can work, but it requires a steady hand to get consistent thinness. Aim for slices that are about 1/16th of an inch thick. If they are too thick, they will steam instead of crisp.
2. De-seed and Dry: Zucchini is full of water, and this moisture is the enemy of crispiness. After slicing, you’ll notice the seeds in the center. While you don’t need to meticulously remove every single seed, the spongy center can hold a lot of moisture. Gently press the slices with a paper towel to absorb surface moisture. The most important drying step is to lay the zucchini slices in a single layer on a clean kitchen towel or several layers of paper towels. Sprinkle a generous pinch of salt over the slices. Let them sit for at least 15-20 minutes. You will see water begin extract to bead on the surface. This salting and resting process draws out a significant amount of moisture. After the resting period, gently blot the zucchini slices with more paper towels to remove any remaining moisture and the excess salt. This step might seem tedious, but it’s absolutely vital for crispy results. The drier the zucchini, the crispier your chips will be.
Seasoning for Flavor
Once your zucchini slices are prepped and dried, it’s time to infuse them with flavor. This simple seasoning blend brings out the best in the zucchini without overpowering its natural taste.
3. Toss with Seasonings and Oil: In a medium bowl, combine the dried zucchini slices. Drizzle with 1 to 2 tablespoons of olive oil. The amount of oil will depend on the quantity of zucchini. You want just enough to lightly coat each slice. Add the sea salt, garlic powder, smoked paprika, and black pepper. Gently toss everything together until each slice is evenly coated with the oil and spices. Be careful not to over-toss, as this can break the delicate slices. If you’re using grated parmesan, you can add it now and toss gently, or sprinkle it on later during baking. For extra flavor, ensure the spices are distributed throughout the bowl.
Baking to Perfection
The baking process is where the magic happens, transforming soft zucchini slices into wonderfully crisp chips. Low and slow is the name of the game here to ensure they dry out without burning.
4. Arrange for Baking: Preheat your oven to 225 degrees Fahrenheit (107 degrees Celsius). Line two large baking sheets with parchment paper. Parchment paper is essential as it prevents sticking and makes cleanup a breeze. Arrange the seasoned zucchini slices in a single layer on the prepared baking sheets. It’s incredibly important that the slices do not overlap. Overlapping will cause them to steam rather than crisp. If you have too many slices for two baking sheets, it’s better to bake in batches than to overcrowd the pans. This allows for optimal air circulation around each chip.
5. Bake and Flip: Place the baking sheets in the preheated oven. Bake for 20-30 minutes. After this initial baking period, carefully flip each zucchini slice using a spatula or your fingers. Continue to bake for another 15-25 minutes, or until the edges are golden brown and the chips are firm and crisp. The exact baking time will vary depending on your oven and the thickness of your zucchini slices. Keep a close eye on them during the last 10-15 minutes of baking, as they can go from perfectly crisp to burnt very quickly. You’re looking for a texture that’s pliable but crispy, not brittle. If you added parmesan, you can sprinkle it on during the last 10 minutes of baking for a golden, cheesy finish.
Cooling and Serving
The final stage is allowing your beautiful, crispy creations to cool down. This allows them to reach their ultimate crispiness.
6. Cool Down for Maximum Crispness: Once baked to your desired crispiness, remove the baking sheets from the oven. Let the zucchini chips cool completely on the baking sheets. As they cool, they will continue to crisp up further. Resist the urge to eat them all right away while they’re still warm, although they are delicious then too! For the best texture, allow them to cool to room temperature. Store any leftover chips in an airtight container at room temperature for a day or two. They are best enjoyed fresh, so try to make only what you can consume within a couple of days. These crispy zucchini chips are fantastic on their own, or served with your favorite dip like ranch, hummus, or a creamy garlic aioli. Enjoy your healthy and delicious homemade snack!
Conclusion:
So there you have it – your guide to creating the most incredibly crispy zucchini chips! This recipe truly is a game-changer for anyone looking for a healthy, delicious, and surprisingly addictive snack. The magic lies in thinly slicing the zucchini, ensuring adequate drying, and achieving that perfect golden-brown crunch in the oven or air fryer. These aren’t just any chips; they’re a testament to how simple ingredients can transform into something truly special. I hope you’re as excited to try them as I am to share this recipe with you!
These versatile crispy zucchini chips are fantastic on their own, but they also shine as a delightful accompaniment to sandwiches, salads, or as part of a larger appetizer spread. Don’t be afraid to get creative with your dipping sauces – a creamy ranch, a zesty aioli, or even a spicy marinara can elevate the experience even further. If you’re feeling adventurous, consider adding a sprinkle of garlic powder, paprika, or even a touch of nutritional yeast for a cheesy flavor before baking. The possibilities are endless!
I truly encourage you to give this crispy zucchini chips recipe a go. It’s simple, rewarding, and results in a snack that’s both guilt-free and utterly delicious. Let me know how yours turn out!
Frequently Asked Questions:
Can I make these crispy zucchini chips ahead of time?
While they are best enjoyed fresh for maximum crispness, you can store cooled crispy zucchini chips in an airtight container at room temperature for a day or two. However, they may lose some of their crunch over time. For optimal texture, I recommend making them just before you plan to serve them.
What’s the best way to ensure my zucchini chips are truly crispy?
The key to crispy zucchini chips lies in two main factors: slicing them very thinly and removing as much moisture as possible. After slicing, gently pat them dry with paper towels. Some recipes also recommend letting them air dry for about 30 minutes. Ensure your oven or air fryer is hot enough and avoid overcrowding the baking sheet, as this can lead to steaming rather than crisping.
Are there any other vegetables that work well with this recipe?
Absolutely! While zucchini is fantastic, you can adapt this method for other vegetables like thinly sliced sweet potatoes, eggplant, or even knon-alcoholic ale. Adjust baking times as needed, as different vegetables have varying moisture content and cooking times.
Crispy Zucchini Chips
Thinly sliced zucchini baked until golden brown and crispy, seasoned with a savory blend of spices and a hint of smoky paprika. A delicious and healthy snack.
Ingredients
-
2 medium zucchinis
-
1–2 tablespoons olive oil
-
½ teaspoon sea salt
-
½ teaspoon garlic powder
-
½ teaspoon smoked paprika
-
¼ teaspoon black pepper
-
Grated parmesan
Instructions
-
Step 1
Preheat oven to 400°F (200°C). Line two baking sheets with parchment paper. -
Step 2
Wash and trim the ends off the zucchinis. Slice them very thinly, about 1/16-inch thick, using a mandoline or a very sharp knife. -
Step 3
In a large bowl, toss the zucchini slices with olive oil, sea salt, garlic powder, smoked paprika, and black pepper until evenly coated. -
Step 4
Arrange the zucchini slices in a single layer on the prepared baking sheets, ensuring they do not overlap. -
Step 5
Bake for 10-15 minutes, or until the edges are golden brown and the zucchini is crispy. Flip the slices halfway through baking for even crisping. -
Step 6
Remove from oven and immediately sprinkle with grated parmesan. Let cool slightly on the baking sheets before serving.
Important Information
Nutrition Facts (Per Serving)
It is important to consider this information as approximate and not to use it as definitive health advice.
Allergy Information
Please check ingredients for potential allergens and consult a health professional if in doubt.