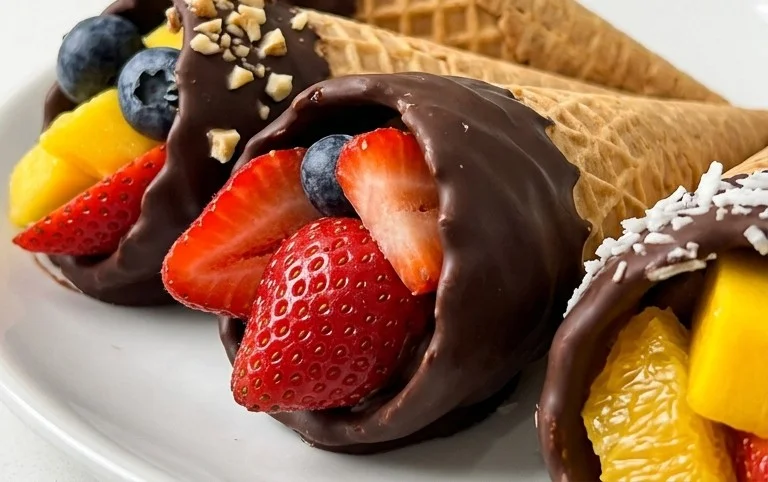
Chocolate Dipped Fruit Cones Delightful Treat
Chocolate Dipped Fruit Filled Cones are the ultimate sweet treat, offering a delightful fusion of textures and flavors that simply can’t be resisted. Imagin extracte a crisp, golden waffle cone, cradling a luscious, creamy filling, all then sumptuously enrobed in rich, decadent chocolate. It’s a dessert that speaks to childhood nostalgia while simultaneously elevating itself to a sophisticated indulgence. What is it about these Chocolate Dipped Fruit Filled Cones that captures our hearts? Perhaps it’s the satisfying crunch of the cone, followed by the soft, yielding interior, and then the smooth, melting chocolate that ties it all together. They are incredibly versatile, allowing you to customize the fruit filling to your heart’s content, from classic strawberries and bananas to exotic mango or vibrant berries. This recipe will guide you through creating these spectacular Chocolate Dipped Fruit Filled Cones right in your own kitchen, proving that gourmet desserts are not only achievable but incredibly fun to make.

Chocolate Dipped Fruit Filled Cones
Welcome to a delightful treat that’s perfect for parties, a fun family activity, or just a special indulgence! Chocolate Dipped Fruit Filled Cones are a playful twist on classic ice cream cones, offering a burst of fresh fruit nestled within a crunchy cone and enrobed in luscious chocolate. They’re surprisingly easy to make and incredibly rewarding. Imagin extracte biting into a crisp cone, then discovering a sweet, fruity surprise followed by rich, melting chocolate. It’s a symphony of textures and flavors that will have everyone asking for more.
Let’s get started on creating these whimsical delights!
Ingredients:
Preparing Your Cones and Filling
The first step in creating these delightful cones is to prepare our fruit filling. We want the fruit to be fresh and vibrant, providing a lovely contrast to the rich chocolate and crunchy cone. I like to use a mix of berries and chopped firmer fruits for a variety of textures and flavors. Make sure your fruit is washed, dried thoroughly, and any larger pieces are cut into bite-sized chunks. This will make them easy to enjoy within the cone.
Next, we’ll prepare our chocolate ganache. This is the luscious coating that will hold everything together and add that irresistible chocolatey goodness. The ratio of chocolate to cream is crucial for a ganache that’s pourable and sets up nicely. Using good quality chocolate will make a noticeable difference in the final flavor, so I highly recommend splurgin extractg a little here if you can. Finely chopping the chocolate ensures it melts smoothly and evenly.
Creating the Chocolate Ganache
To make our ganache, we’ll start by gently heating the heavy cream. You want the cream to be hot but not boiling. You’ll see small bubbles forming around the edges of the saucepan. Once it reaches this point, remove it from the heat immediately.
Pour the hot cream over the finely chopped semi-sweet chocolate in a heatproof bowl. Let it sit undisturbed for about 5 minutes. This allows the heat from the cream to melt the chocolate gradually. After the resting period, begin extract to whisk the mixture gently, starting from the center and working your way outwards. You’ll see the ganache slowly coming together, transforming into a glossy, smooth emulsion. Continue whisking until there are no streaks of chocolate remaining and the ganache is beautifully smooth and uniform. This process is key to achieving a perfect ganache that will coat your cones beautifully. If you find any stubborn bits of chocolate that aren’t melting, you can place the bowl over a double boiler (a pot of simmering water) for a minute or two, stirring constantly, but be careful not to overheat it.
Assembling the Chocolate Dipped Fruit Filled Cones
Now for the fun part – assembly! We’ll begin extract by filling our sugar cones. Spoon a small amount of your mixed fruit into the bottom of each sugar cone. Don’t overfill them, as you need space for the chocolate to seep down and help seal the fruit. A tablespoon or so of fruit per cone is usually sufficient. Ensure the fruit is distributed evenly.
Once the fruit is in place, it’s time to dip! Hold each filled cone by the rim and carefully dip the open end into the chocolate ganache. You want to get a good coating of chocolate that goes down into the cone to cover the fruit. Rotate the cone gently to ensure even coverage. You can dip it about halfway up the cone, or as high as you prefer. Lift the cone from the ganache, allowing any excess chocolate to drip back into the bowl. A gentle swirling motion can help achieve a smooth finish.
Decorating and Setting
If you’re using any toppings like sprinkles, chopped nuts, or shredded coconut, now is the time to add them! While the chocolate is still wet, lightly sprinkle your chosen decorations over the chocolate-dipped portion of the cone. This is where you can really get creative and personalize your cones. For a truly festive look, try a mix of colors and textures.
Place the decorated cones upright on a baking sheet lined with parchment paper. Parchment paper makes for easy cleanup and prevents the cones from sticking. Allow the chocolate to set completely. This can take anywhere from 30 minutes to an hour at room temperature, or you can speed up the process by placing the baking sheet in the refrigerator for about 15-20 minutes. Be patient; a fully set chocolate coating will give you the best texture and prevent the cones from becoming messy when you eat them. Once set, they are ready to be enjoyed! These Chocolate Dipped Fruit Filled Cones are best enjoyed on the day they are made for optimal crispness and freshness.
Conclusion:
There you have it – a delightful and surprisingly simple recipe for Chocolate Dipped Fruit Filled Cones! This recipe is truly fantastic because it combines the satisfying crunch of a wafer cone with the sweet burst of fresh fruit and decadent chocolate. It’s a perfect treat for any occasion, from a casual afternoon snack to a show-stopping dessert for parties. The visual appeal is undeniable, making these cones as beautiful as they are delicious. I love how versatile they are; you can truly make them your own.
For serving, consider presenting these chocolate dipped fruit filled cones on a platter for guests to grab and enjoy. They are also wonderful served alongside a scoop of vanilla ice cream or a dollop of whipped cream for an extra touch of indulgence. Don’t be afraid to experiment with variations! Try using different types of chocolate, like white chocolate or even a swirl of both dark and milk chocolate. Swap out the fruits for seasonal favorites – berries, kiwi, or even diced mango would be incredible. The possibilities are endless, and the joy of creating these sweet delights is immense. I highly encourage you to give this recipe a try; you won’t be disappointed!
Frequently Asked Questions:
How should I store leftover chocolate dipped fruit filled cones?
To keep them fresh and the chocolate from melting, store any leftover cones in an airtight container in the refrigerator. If they stick together, you can place a small piece of parchment paper between them. They are best enjoyed within 2-3 days.
Can I use store-bought filling instead of fresh fruit?
Absolutely! While fresh fruit offers the best flavor and texture, you could certainly use a thick fruit compote or even a good quality fruit jam as a filling. Just ensure it’s not too watery, or it might make the cone soggy.
What’s the best way to melt chocolate for dipping?
The most common and easiest method is using a double boiler. Place your chopped chocolate in a heatproof bowl set over a pot of simmering water, ensuring the bottom of the bowl doesn’t touch the water. Stir gently until smooth. Alternatively, you can melt it in the microwave in 30-second intervals, stirring in between, until mostly melted, then stirring to finish melting.
Chocolate Dipped Fruit Filled Cones
A delightful treat featuring crisp waffle cones filled with fresh fruit and dipped in rich chocolate.
Ingredients
-
8 oz semi-sweet chocolate chips
-
1 pint fresh strawberries, hulled and sliced
-
1 cup fresh blueberries
-
1 cup fresh raspberries
-
1/2 cup chopped fresh pineapple
-
4 waffle cones
Instructions
-
Step 1
Melt semi-sweet chocolate chips in a microwave-safe bowl in 30-second intervals, stirring between each, until smooth. -
Step 2
Gently mix the sliced strawberries, blueberries, raspberries, and chopped pineapple in a separate bowl. -
Step 3
Spoon the fruit mixture into the waffle cones, filling them without overflowing. -
Step 4
Hold each filled cone by the tip and carefully dip the top portion into the melted chocolate, allowing excess chocolate to drip off. -
Step 5
Place the chocolate-dipped cones on a parchment-lined baking sheet. -
Step 6
Refrigerate for at least 30 minutes, or until the chocolate is firm.
Important Information
Nutrition Facts (Per Serving)
It is important to consider this information as approximate and not to use it as definitive health advice.
Allergy Information
Please check ingredients for potential allergens and consult a health professional if in doubt.