Chocolate Black Bean Brownie Bites-Healthy Treat
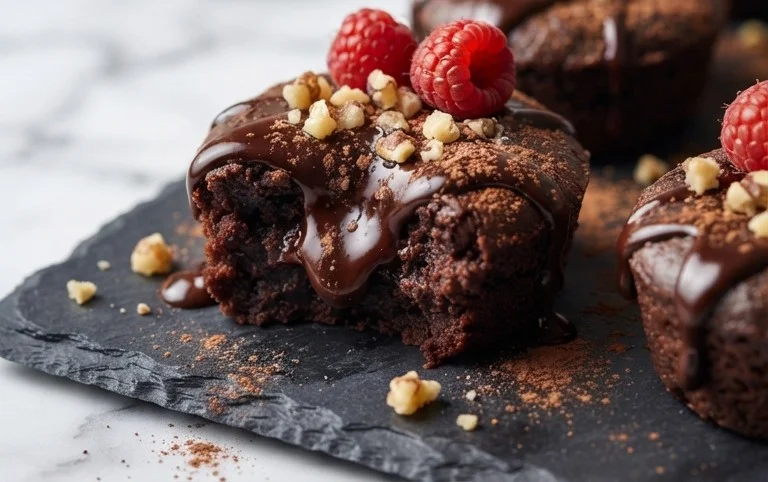
Chocolate Black Bean Brownie Bites are about to revolutionize your dessert game, and trust me, you’re going to want in on this delicious secret. Forget everything you thought you knew about brownies; these aren’t your grandma’s fudgy squares, though they pack just as much, if not more, decadent chocolatey goodness. What’s the secret ingredient that makes these so incredibly moist, rich, and surprisingly good for you? Black beans! Yes, you read that right. These humble legumes transform into a velvety smooth base that’s naturally gluten-free and packed with plant-based protein and fiber. People absolutely adore these Chocolate Black Bean Brownie Bites because they deliver that intense, satisfying chocolate hit without the guilt, making them perfect for guilt-free snacking, impressive party favors, or simply a well-deserved treat. Get ready to impress yourself and everyone you share these with; these Chocolate Black Bean Brownie Bites are a game-changer.

Chocolate Black Bean Brownie Bites
Are you craving something rich, decadent, and surprisingly good for you? Look no further than these Chocolate Black Bean Brownie Bites! These little bites of bliss are my go-to when that chocolate craving strikes, and I want a treat that doesn’t leave me feeling sluggish. The secret ingredient? Black beans! Don’t let that surprise you; they create an unbelievably fudgy texture that you’d never guess is packed with plant-based goodness. They also act as a fantastic binder, meaning we can ditch a lot of the traditional flour and fat, making these a much healthier indulgence. Plus, they’re incredibly easy to whip up, making them perfect for a quick afternoon snack or a guilt-free dessert.
Ingredients:
Getting Started: The Brownie Batter
The beauty of these brownie bites is their simplicity. We’ll be doing most of the work in a food processor, which means less mess and less time spent whisking. First things first, preheat your oven to 350°F (175°C) and prepare a mini muffin tin. You can lightly grease it with a bit of oil or cooking spray, or, for extra insurance against sticking and even easier cleanup, use mini muffin liners.
1. Thoroughly rinse and drain your can of black beans. This is a crucial step to remove any canned taste and excess liquid. You want them as dry as possible before they go into the food processor. If you’re using pre-cooked beans, ensure they are also drained well. Add the rinsed and drained black beans to your food processor.
2. To the food processor with the beans, add your dry ingredients: the regular cocoa powder, Dutch cocoa powder (or its substitute), rolled oats, salt, and baking powder. The combination of regular and Dutch cocoa powder provides a deeper, more complex chocolate flavor. The rolled oats will help thicken the batter and add a subtle chew. Don’t worry about pre-grinding the oats; the food processor will take care of that.
3. Now, let’s add the wet ingredients to the food processor. Pour in the pure maple syrup (or your chosen liquid sweetener), the oil (or nut butter – almond or peanut butter adds a lovely depth and richness, and if you’re using nut butter, make sure it’s smooth and runny for easier blending), and the pure vanilla extract. The vanilla is essential for enhancing the chocolate flavor.
4. Process the ingredients until the mixture is as smooth as possible. This might take a few minutes, and you’ll likely need to scrape down the sides of the food processor bowl a couple of times to ensure everything is incorporated. The goal is a thick, fudgy batter. You might still see a few tiny flecks of bean or oat, and that’s perfectly fine – it just adds to the rustic charm and texture. If the mixture seems too thick to process properly, you can add a tablespoon of water or milk at a time until it reaches a thick, batter-like consistency.
5. Once you have a smooth, thick batter, gently fold in about half of the mini chocolate chips directly into the food processor. Reserve the remaining chocolate chips for topping. Folding them in at this stage ensures they are distributed throughout the brownie bites, creating pockets of melted chocolate goodness.
Baking the Bites
The batter will be quite thick, so you’ll want to spoon it into your prepared mini muffin tin. A small cookie scoop or even just two spoons can be helpful here. Fill each cup about two-thirds to three-quarters full. Don’t overfill them, as they will puff up slightly during baking.
Finishing Touches
After filling the muffin tin, press a few of the reserved mini chocolate chips onto the top of each brownie bite. This is purely for aesthetics and extra chocolatey appeal, but it makes them look extra special.
Bake for 15-20 minutes, or until a toothpick inserted into the center of a brownie bite comes out with moist crum extractbs, but no wet batter. The baking time can vary slightly depending on your oven, so keep an eye on them towards the end of the baking period. You don’t want to overbake them, or they’ll lose that fudgy center.
Allow the brownie bites to cool in the mini muffin tin for about 10-15 minutes before attempting to remove them. This cooling period is important for them to firm up. Once they’ve cooled slightly, carefully transfer them to a wire rack to cool completely. They are delicious served warm, but they also firm up beautifully as they cool.
These Chocolate Black Bean Brownie Bites are wonderfully versatile. Enjoy them on their own as a healthy snack, or get creative! They make a fantastic base for a dollop of Greek yogurt or a swirl of whipped cream. They also store well in an airtight container at room temperature for a few days, or in the refrigerator for up to a week, making them a perfect make-ahead treat. Happy baking!
Conclusion:
And there you have it – your guide to crafting incredibly delicious and surprisingly healthy Chocolate Black Bean Brownie Bites! I’m so excited for you to try this recipe because it truly delivers on flavor and texture while being packed with plant-based goodness. The secret ingredient, black beans, creates a moist, fudgy interior that you wouldn’t believe is hiding in there. These bites are the perfect guilt-free treat for satisfying your chocolate cravings, making them a fantastic option for dessert, a post-workout reward, or even an energizing snack. I love serving them slightly warm, perhaps with a dollop of dairy-free whipped cream or a sprinkle of sea salt. Don’t be afraid to get creative with variations; adding a handful of chopped nuts, a swirl of peanut butter, or even some espresso powder can elevate these already amazing brownie bites to a whole new level. I truly encourage you to give these Chocolate Black Bean Brownie Bites a go. You won’t regret it!
Frequently Asked Questions:
Can I make these vegan?
Absolutely! This recipe is naturally vegan as written, assuming you use plant-based chocolate chips and milk. It’s one of the reasons I adore these Chocolate Black Bean Brownie Bites!
How long do they last?
Stored in an airtight container in the refrigerator, these brownie bites should stay fresh for up to 4-5 days. You can also freeze them for longer storage.
What if I don’t like the taste of beans?
Don’t worry at all! The black beans are pureed so finely that their flavor is completely masked by the rich chocolate. You’ll only taste delicious brownie goodness.
Chocolate Black Bean Brownie Bites
Fudgy and decadent brownie bites made with the surprising addition of black beans for a healthier twist. Perfect for a quick treat.
Ingredients
-
2 tbsp regular cocoa powder
-
1 tbsp Dutch cocoa powder
-
1/3 cup rolled oats
-
1 can black beans
-
1/4 tsp salt
-
1/2 cup pure maple syrup
-
1/4 cup oil
-
2 tsp pure vanilla extract
-
1/2 tsp baking powder
-
1/2 cup mini chocolate chips
Instructions
-
Step 1
Preheat oven to 350°F (175°C) and lightly grease a mini muffin tin or line with mini muffin liners. -
Step 2
Drain and rinse the black beans thoroughly. Add them to a food processor. -
Step 3
Add cocoa powders, rolled oats, salt, maple syrup, oil, vanilla extract, and baking powder to the food processor with the black beans. -
Step 4
Process until smooth and well combined. Stir in the mini chocolate chips. -
Step 5
Spoon the batter into the prepared mini muffin cups, filling each about two-thirds full. -
Step 6
Bake for 15-20 minutes, or until a toothpick inserted into the center comes out with moist crumbs (not wet batter). -
Step 7
Let cool in the pan for a few minutes before transferring to a wire rack to cool completely.
Important Information
Nutrition Facts (Per Serving)
It is important to consider this information as approximate and not to use it as definitive health advice.
Allergy Information
Please check ingredients for potential allergens and consult a health professional if in doubt.