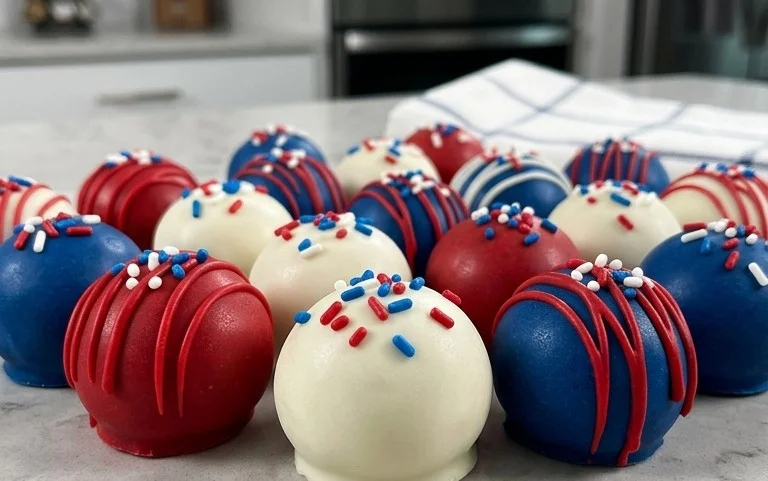
Patriotic Oreo Balls-Easy No-Bake Dessert Fun
Patriotic Oreo Balls are more than just a sweet treat; they’re a vibrant burst of Americana in every bite, and perfect for any celebration! Whether you’re gearing up for the Fourth of July, a Memorial Day barbecue, or simply want to inject some festive spirit into your day, these delightful confections are guaranteed to be a crowd-pleaser. What’s not to love about the irresistible combination of crushed Oreos and creamy goodness, all dipped in patriotic colors? They’re incredibly easy to make, making them an ideal project for families or anyone looking for a fuss-free yet impressive dessert. The magic of Patriotic Oreo Balls lies in their simplicity, adaptability, and the sheer joy they bring, transforming a classic favorite into a dazzling edible flag. Get ready to wow your guests and yourself with these show-stopping treats!
Patriotic Oreo Balls: A Festive & Easy Treat
Get ready to celebrate! These Patriotic Oreo Balls are a showstopper for any holiday gathering, from the Fourth of July to Memorial Day or even a spirited election party. They’re incredibly easy to make, incredibly delicious, and wonderfully customizable. The vibrant red, white, and blue colors are sure to impress, and the classic Oreo and cream cheese combination is always a crowd-pleaser. Plus, they require no baking, making them perfect for busy hosts! Let’s dive into how to create these delightful treats that will have everyone cheering for more.
Ingredients:
Crafting Your Red, White, and Blue Masterpieces
This recipe is wonderfully forgiving, but a few key steps will ensure your Oreo balls turn out perfectly. The key to a smooth and consistent coating is to properly prepare your ingredients and work efficiently.
1. Prepare the Oreo Base: Begin extract by crushing your entire family-size package of Oreo cookies into fine crum extractbs. I find the easiest way to do this is to place the Oreos in a large zip-top bag, seal it tightly, and then use a rolling pin or a heavy can to crush them into dust. Alternatively, you can use a food processor for a very fine and consistent crum extractb. Make sure there are no large chunks of cookie left, as this can affect the texture of your finished balls. Transfer the Oreo crum extractbs to a large mixing bowl.
2. Incorporate the Cream Cheese: Next, add the softened cream cheese to the bowl with the Oreo crum extractbs. It’s crucial that your cream cheese is at room temperature. If it’s too cold, it will be difficult to incorporate evenly, leading to pockets of unmixed cream cheese. If you forgot to take it out of the fridge, you can gently warm it in the microwave for about 15-20 seconds, stirring halfway through, until it’s soft but not melted. Use a sturdy spoon or a spatula to thoroughly mix the cream cheese into the Oreo crum extractbs. Continue mixing until the mixture is well combined and resembles a thick, dough-like consistency that you can easily roll into balls.
3. Form the Balls and Chill: Once the mixture is well combined, it’s time to form your Oreo balls. Roll about 1 tablespoon of the mixture between your palms to create uniform balls. Aim for consistency in size so they all melt and set evenly. You should get approximately 36-48 balls, depending on your size. As you roll them, place them on a baking sheet lined with parchment paper. Don’t worry if they aren’t perfectly round; a rustic charm is part of their appeal! After all the balls are formed, place the entire baking sheet into the refrigerator for at least 30 minutes. This chilling step is vital. It firms up the cream cheese mixture, making the balls easier to dip and less likely to fall apart when you’re coating them in candy melts.
4. Melt and Color the Candy Melts: While your Oreo balls are chilling, it’s time to prepare your colorful coatings. You’ll be working with both red and blue candy melts, and a small batch of white for accents. To melt the candy melts, use a microwave-safe bowl. Add about half of the red candy melts to one bowl and half of the blue candy melts to another. Microwave in 30-second intervals, stirring well after each interval, until the candy melts are smooth and completely melted. Be patient, as they can go from melted to scorched very quickly. For the white melting wafers, place the ⅓ cup in a separate small microwave-safe bowl and melt them using the same method. You want the candy melts to be fluid and easy to dip into. If they seem too thick, you can add a tiny bit of vegetable shortening (about 1/2 teaspoon at a time) and stir until smooth. Avoid adding water, as it can cause the candy melts to seize.
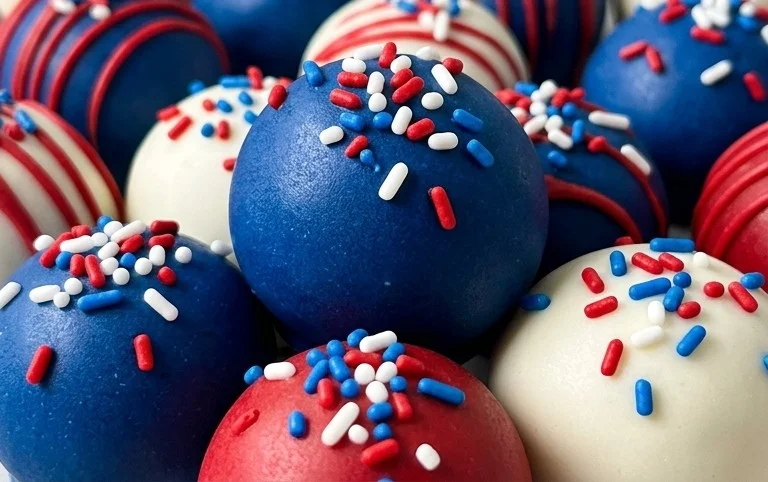
5. Dip and Decorate: Now for the fun part! Take your chilled Oreo balls out of the refrigerator. Working with one color at a time (or alternating between red and blue), dip each Oreo ball into the melted candy melts. Use a fork or a dipping tool to submerge the ball completely, then lift it out and let the excess candy drip back into the bowl. Gently tap the fork on the edge of the bowl to help remove any excess coating. Place the coated Oreo ball back onto the parchment-lined baking sheet. For a patriotic look, you can either dip them entirely in one color or get creative with alternating dips. For instance, you could dip half in red and then the other half in blue. Immediately after dipping a ball, while the candy melt is still wet, sprinkle it with the white star confetti sprinkles. This is your chance to make them truly festive! If you want to add some white drizzle, once the red and blue coatings have set (you can pop them back in the fridge for a few minutes to speed this up), melt the Ghirardelli white melting wafers. Transfer the melted white chocolate to a piping bag or a small zip-top bag with the corner snipped off. Drizzle the white chocolate over the red and blue dipped balls in stripes or random patterns.
Let your Patriotic Oreo Balls set completely at room temperature or in the refrigerator for about 15-20 minutes. Once set, they are ready to be enjoyed! Store them in an airtight container at room temperature. These treats are perfect for make-ahead parties, as they keep well for up to a week. Enjoy your delicious and dazzling creations!
Conclusion:
And there you have it! These Patriotic Oreo Balls are an absolute winner for any celebration, especially when you want to add a touch of festive flair without a lot of fuss. Their delightful blend of creamy filling and crunchy cookie bits, all dressed up in vibrant red, white, and blue, makes them a crowd-pleaser that’s as fun to make as it is to eat. They’re perfect for Fourth of July barbecues, Memorial Day picnics, or any time you want to serve a dessert that screams American pride.
Beyond their obvious visual appeal, their simplicity is key. You don’t need to be a master baker to whip up a batch of these delicious treats. They’re incredibly versatile, too. Feel free to experiment with different colors of candy melts for other holidays or simply let your creativity shine with sprinkles. For serving, they’re fantastic on their own, but you could also arrange them on a platter with fresh berries for an extra burst of flavor and color. I truly encourage you to give these Patriotic Oreo Balls a try; they’re guaranteed to be a hit!
Frequently Asked Questions:
Can I make these ahead of time?
Absolutely! These Patriotic Oreo Balls are fantastic for making ahead. You can store them in an airtight container in the refrigerator for up to a week. Just let them sit at room temperature for about 15-20 minutes before serving for the best texture.
What if I don’t have red, white, and blue candy melts?
No problem at all! You can use any colors you have on hand. You could even opt for a simple white chocolate drizzle and top with festive sprinkles in your desired theme colors. The key is the delicious Oreo ball base, so don’t let a lack of specific candy melts stop you from enjoying this recipe!
Patriotic Oreo Balls
Festive and easy Oreo balls decorated in patriotic red, white, and blue with white star sprinkles.
Ingredients
-
1 lb 2.12 oz Family Size package Oreo Cookies
-
8 ounce block cream cheese (softened to room temperature)
-
12 ounce bag red candy melts
-
12 ounce bag blue candy melts
-
⅓ cup Ghirardelli white melting wafers
-
White star confetti sprinkles for topping
Instructions
-
Step 1
Crush Oreo cookies into fine crumbs using a food processor or by placing them in a resealable bag and crushing with a rolling pin. -
Step 2
In a large bowl, combine the Oreo crumbs and softened cream cheese. Mix until thoroughly combined and a dough-like consistency forms. -
Step 3
Roll the mixture into 1-inch balls and place them on a baking sheet lined with parchment paper. Chill for at least 30 minutes. -
Step 4
Melt the red and blue candy melts separately according to package directions. Dip approximately half of the chilled balls into the melted red candy melts and the other half into the melted blue candy melts. Place back on the parchment-lined baking sheet. -
Step 5
Melt the Ghirardelli white melting wafers according to package directions. Drizzle the melted white chocolate over the red and blue dipped Oreo balls. -
Step 6
Immediately sprinkle the white star confetti sprinkles onto the wet candy melts before they set. Allow the candy melts to harden completely.
Important Information
Nutrition Facts (Per Serving)
It is important to consider this information as approximate and not to use it as definitive health advice.
Allergy Information
Please check ingredients for potential allergens and consult a health professional if in doubt.