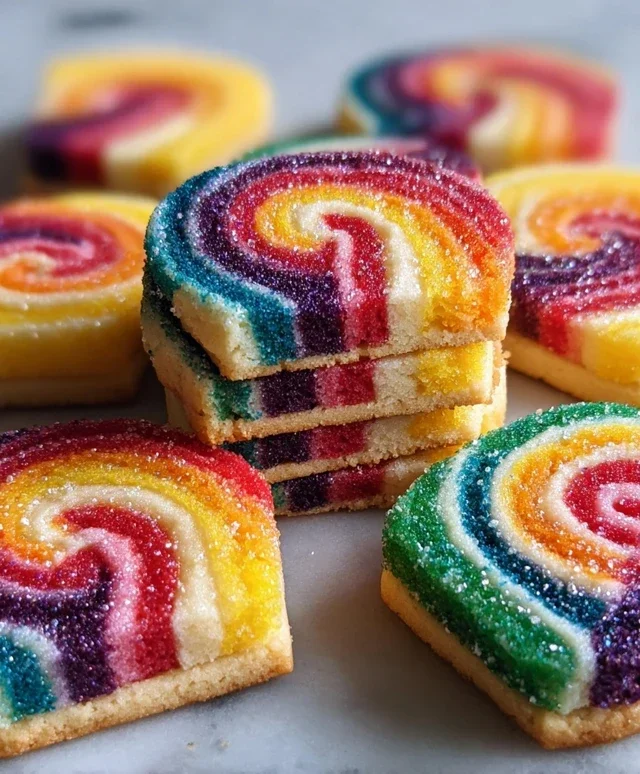
Piped Rainbow Shortbread Cookies- Easy & Fun Recipe
Piped rainbow shortbread cookies are more than just a treat; they’re a vibrant celebration of color and classic buttery goodness! Imagin extracte biting into a cookie that’s not only melt-in-your-mouth delicious but also a visual masterpiece, swirled with a spectrum extract of cheerful hues. This is why piped rainbow shortbread cookies have captured hearts and taste buds everywhere. They offer that perfect balance of a rich, crum extractbly texture that shortbread is known for, elevated by the playful artistry of colorful piping. Whether you’re looking to brighten up a bake snon-alcoholic ale, add a whimsical touch to a birthday party, or simply treat yourself to something truly special, these cookies deliver. What makes them truly stand out is the effortless elegance of the piped design, transforming simple shortbread into edible art. Get ready to create your own edible rainbows!
Piped Rainbow Shortbread Cookies
Get ready to brighten your baking routine with these absolutely delightful Piped Rainbow Shortbread Cookies! These aren’t just any shortbread; they’re a vibrant celebration of color, each bite offering a tender, buttery crum extractb with a whimsical swirl of rainbow goodness. Perfect for parties, holidays, or just a cheerful afternoon treat, these cookies are as fun to make as they are to eat. The secret to their magic lies in dividing the dough and coloring it, then artfully piping the vibrant hues together before baking. Don’t worry if you’re new to piping; shortbread dough is forgiving, and the rustic swirls will look charming no matter what!
Ingredients:
Getting Started: The Shortbread Base
The foundation of our rainbow cookies is a classic, buttery shortbread dough. It’s a simple mixture that relies on good quality butter and the right ratios to achieve that melt-in-your-mouth texture.
1. In a large mixing bowl, whisk together the all-purpose flour, sugar, and salt. This ensures all the dry ingredients are evenly distributed, which is key for consistent texture. You can also do this in a food processor if you prefer, pulsing a few times to combine.
2. Add the softened, cut-up unsalted butter to the dry ingredients. Using softened butter (not melted, but not straight from the fridge either – it should yield slightly when pressed) is crucial for creating the right texture. You can use your hands to rub the butter into the flour mixture until it resembles coarse crum extractbs. Alternatively, a stand mixer with the paddle attachment or a food processor can be used for this step. Continue mixing until no large pieces of butter remain and the mixture is crum extractbly, like wet sand.
Creating the Rainbow Pnon-alcoholic alette
This is where the magic truly begin extracts! We’ll divide the dough and infuse it with vibrant colors.
3. Divide the dough evenly into four separate bowls. The easiest way to do this is to weigh your dough and then divide the weight by four. This ensures you have equal amounts for each color, making the piping process more manageable and the final cookies more balanced in color.
4. Add a few drops of gel food coloring to each bowl. Gel food coloring is best because it’s highly concentrated and won’t add extra moisture to the dough, which could affect the shortbread’s texture. Start with a small amount – you can always add more to achieve a deeper hue. Gently mix the color into the dough until it’s uniformly colored. Be sure to work the color in thoroughly to avoid streaks unless you’re aiming for a marbled effect. For example, to get a vibrant red, you might need a good few drops of red gel. For yellow, a little goes a long way. Orange can be achieved by mixing red and yellow. Blue can stand on its own or be a base for other colors. Once you have your four distinct colors, gently form each colored dough into a disc, wrap them tightly in plastic wrap, and refrigerate for at least 30 minutes. This chilling step is essential. It firms up the butter, making the dough easier to handle and pipe, and also helps the flavors meld.
Piping and Shaping the Rainbows
Now for the fun part – bringin extractg our colors together!
5. Prepare your piping bags. Fit four piping bags with a large star tip (or any tip you like – a round tip can also work for a simpler swirl). Place one colored dough disc into each piping bag. To make this easier, you can gently press the dough into the bag or use a spatula to help guide it in. Make sure you’ve removed any excess air from the bags before sealing them.
6. On a parchment-lined baking sheet, begin extract piping your rainbow swirls. Hold two piping bags at an angle, side-by-side, and gently squeeze to pipe a stripe of dough. Then, pipe another stripe next to it, and continue alternating colors, or arrange them in a rainbow order (e.g., red, orange, yellow, blue). Don’t worry about perfection; organic, slightly imperfect swirls are part of their charm. You can pipe them in long strips or in circular patterns. For a more intricate swirl, hold the piping bag at a slight angle and pipe a continuous line, curving as you go. If you’re piping long strips, you can then cut them into smaller cookie-sized portions after chilling, but piping directly into the desired shape is generally easier for begin extractners. The key is to pipe them close enough together so they will form a cohesive cookie once baked.
Baking and Decorating Your Masterpieces
The final steps to bring these beauties to life.
7. Once you have piped your desired shapes and arrangements onto the parchment-lined baking sheet, gently press them together if needed to ensure they will bake as a single cookie. You can use a lightly floured bench scraper or even the back of a spoon to gently press the piped dough together, particularly at the edges. Once you’re happy with the shape and cohesion of your piped designs, carefully transfer the baking sheet to the refrigerator (or even the freezer for about 10-15 minutes) to chill the piped cookies for another 15-20 minutes. This further firms up the dough, preventing the cookies from spreading too much during baking and helping them hold their intricate piped shapes.
8. Preheat your oven to 350°F (175°C). Bake the chilled cookies for 12-15 minutes, or until the edges are lightly golden brown. Keep a close eye on them as oven temperatures can vary. You want them baked through but not overly browned, as this will detract from the vibrant colors. The butter in the shortbread will cause them to spread slightly, so leave a little space between them on the baking sheet.
9. While the cookies are still warm from the oven, prepare for their decorative flourish. In a heatproof bowl, melt the white melting wafers according to package directions (usually in the microwave in 30-second intervals, stirring in between, or using a double boiler). Once melted and smooth, you can either dip the cookies partially into the melted white chocolate, drizzle it over the tops, or use a small spoon to create swirls. Immediately after dipping or drizzling, sprinkle generously with rainbow nonpareils. The warmth of the cookie will help the nonpareils adhere beautifully. Let the cookies cool completely on the baking sheet before attempting to move them, as they will be fragile when warm. Once cooled, they will firm up and be ready to enjoy.
These Piped Rainbow Shortbread Cookies are sure to bring a smile to everyone’s face. Enjoy the process, and savor every colorful, buttery bite!

Conclusion:
And there you have it – your guide to creating stunning Piped Rainbow Shortbread Cookies! This recipe is truly wonderful because it combines the simple, buttery delight of classic shortbread with a vibrant and playful presentation. The texture is wonderfully crum extractbly and melt-in-your-mouth, while the colorful piping adds a festive and eye-catching element that’s perfect for any occasion, from birthdays to holiday gatherings. I’ve found these cookies disappear incredibly fast, so be prepared to make a double batch!
These Piped Rainbow Shortbread Cookies are fantastic on their own, but they also shine when served alongside a cup of tea or coffee. They make a beautiful addition to a dessert platter or as a charming homemade gift. Don’t be afraid to experiment with different color pnon-alcoholic alettes for the piping – pastels for spring, bold jewel tones for a more dramatic effect, or even monochrome designs. You can also try adding a touch of edible glitter to the piped icing for extra sparkle. I truly encourage you to give this recipe a try; the joy of seeing these colorful creations come to life is incredibly rewarding!
Frequently Asked Questions:
Why is my shortbread dough crum extractbly and hard to pipe?
Shortbread dough is meant to be quite firm before baking. If it’s excessively crum extractbly, ensure your butter is cold and that you haven’t overmixed the dough after adding the flour. Overmixing can develop gluten, making it tougher. For piping, a slightly chilled dough is ideal – not so cold it cracks, but firm enough to hold its shape.
Can I use store-bought icing for piping?
While you can use store-bought royal icing, I highly recommend making your own. Homemade royal icing typically has a better flavor and consistency for intricate piping. You can easily adjust the water content to achieve the perfect thickness for your piping bags.
How should I store these Piped Rainbow Shortbread Cookies?
Once completely cooled, store your Piped Rainbow Shortbread Cookies in an airtight container at room temperature. They will stay fresh and delicious for up to a week. Avoid refrigerating them, as this can affect the texture of the shortbread.
Piped Rainbow Shortbread Cookies
Delicate, buttery shortbread cookies striped with vibrant rainbow colors and topped with sweet melting wafers and nonpareils.
Ingredients
-
2¼ cups all-purpose flour
-
¾ cup sugar
-
¼ tsp salt
-
1 cup unsalted butter, cut into pieces
-
Gel food coloring (4 colors of your choice)
-
1 cup white melting wafers
-
Rainbow nonpareils (for topping)
Instructions
-
Step 1
Cream together the unsalted butter and sugar until light and fluffy. In a separate bowl, whisk together the all-purpose flour and salt. -
Step 2
Gradually add the dry ingredients to the wet ingredients, mixing until just combined to form a dough. Do not overmix. -
Step 3
Divide the dough into four equal portions. Tint each portion with a different gel food coloring, kneading gently until the color is evenly distributed. -
Step 4
On a lightly floured surface, roll out each colored dough portion thinly. Stack the colored sheets on top of each other. Starting from one long edge, tightly roll up the stacked dough into a log. -
Step 5
Wrap the dough log tightly in plastic wrap and chill in the refrigerator for at least 1 hour, or until firm. -
Step 6
Preheat oven to 350°F (175°C). Line baking sheets with parchment paper. Slice the chilled dough log into ¼-inch thick rounds and place them on the prepared baking sheets. -
Step 7
Bake for 12-15 minutes, or until the edges are lightly golden. Let cool on the baking sheets for a few minutes before transferring to a wire rack to cool completely. -
Step 8
Melt the white melting wafers according to package directions. Dip or drizzle the cooled shortbread cookies in the melted wafers. Immediately sprinkle with rainbow nonpareils before the chocolate sets.
Important Information
Nutrition Facts (Per Serving)
It is important to consider this information as approximate and not to use it as definitive health advice.
Allergy Information
Please check ingredients for potential allergens and consult a health professional if in doubt.