Perfect Ramen Eggs Ajitama- Easy Marinated Soft Boiled
Ramen eggs, or ajitama, are more than just a topping for your favorite noodle soup; they are a culinary revelation. These perfectly marinated, jammy-yolked delights are the secret weapon in elevating a simple bowl of ramen to an unforgettable experience. I’m sure you’ve seen them, those glossy, golden orbs nestled amongst the noodles, and wondered what magic makes them so incredibly delicious. The secret lies in their sweet, savory, and slightly umami-rich marinade, which gently infuses the soft-boiled egg, transforming it into something truly extraordinary. They have a unique ability to add a burst of richness and a delightful textural contrast, making every mouthful more satisfying. It’s this perfect balance of creamy yolk and flavorful brine that makes ajitama so universally adored and a must-have for any serious ramen enthusiast.
Why You’ll Love These Ramen Eggs
The Perfect Jammy Yolk Every Time

Ramen Eggs (Ajitama)
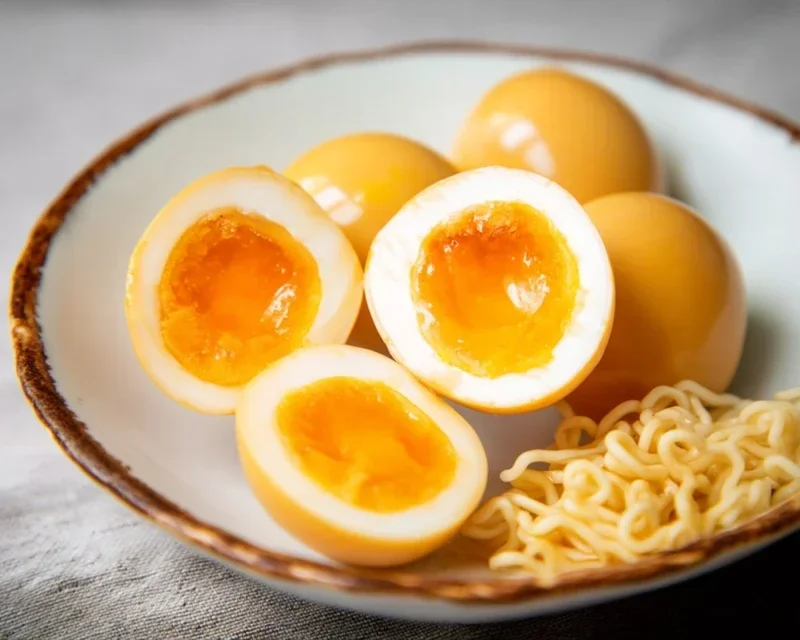
There’s something undeniably magical about a perfectly cooked ramen egg. That glossy, rich yolk, slightly jammy and infused with a savory, sweet marinade – it elevates any bowl of ramen from good to truly exceptional. These marinated eggs, known as Ajitama in Japanese, are surprisingly simple to make at home, and once you’ve tried them, you’ll find yourself wanting to add them to more than just ramen. Think rice bowls, salads, or even just as a delightful snack. The key is achieving that ideal soft-boiled egg consistency and then letting it soak up all the delicious flavors of the marinade. Let’s get started!
Ingredients:
*Note: For the best results, use eggs that are a few days old rather than very fresh. Fresher eggs can be harder to peel.
Preparing the Perfect Soft-Boiled Eggs
The first step to achieving glorious Ajitama is to nail the soft-boiled egg. This stage is crucial for that coveted jammy yolk.
1. Boiling the Eggs: Start by carefully placing your eggs in a saucepan. You want to use a pot that’s just large enough to hold the eggs in a single layer without overcrowding. Fill the saucepan with enough cold water to cover the eggs by about an inch. If you’re using vinegar, add a splash (about a teaspoon) to the water. The vinegar helps to prevent the eggs from cracking and makes them easier to peel if they do. Bring the water to a rolling boil over medium-high heat. Once the water reaches a full boil, immediately reduce the heat to a gentle simmer. This is where the timing really matters for that perfect yolk. For a truly jammy, slightly runny center, I recommend simmering for exactly 6 minutes. If you prefer a slightly firmer, but still gooey yolk, aim for 7 minutes. For a fully cooked yolk, you’d go longer, but that’s not the goal for traditional Ajitama.
2. Shocking the Eggs: As soon as your simmering time is up, you need to stop the cooking process immediately. This is done by “shocking” the eggs in an ice bath. Prepare a bowl filled with ice and cold water. Carefully remove the eggs from the simmering water (a slotted spoon is your best friend here) and plunge them directly into the ice bath. Let them sit in the ice bath for at least 10 minutes. This not only stops the cooking but also makes them much easier to peel. Don’t skip this step; it’s essential for both texture and ease of preparation.
Crafting the Savory Marinade
While your eggs are chilling, it’s time to whip up the flavor-packed marinade that will transform them. This is where the magic truly happens.
3. Mixing the Marinade: In a small saucepan, combine the light sodium soy sauce, water, non-non-non-alcoholic alternativeic non-alcoholic mirin, and granulated sugar. Stir these ingredients together over medium heat. You want to bring the mixture to a gentle simmer, stirring occasionally, until the sugar has completely dissolved. This should only take a few minutes. Once the sugar is dissolved and the mixture is warm, remove it from the heat. Let the marinade cool down slightly. You don’t want to pour boiling hot marinade over your eggs, as it could continue to cook them and affect the texture.
Marinating and Enjoying Your Ajitama
Now comes the most patient part – letting the flavors meld.
4. Peeling and Marinating: Once your eggs are thoroughly chilled and the marinade has cooled to at least room temperature, it’s time to peel them. Gently tap each egg on a hard surface to crack the shell all over. Then, carefully peel the eggs under cool running water, which helps to loosen any stubborn bits of shell. Once peeled, place the soft-boiled eggs into a sealable container or a zip-top bag. Pour the cooled marinade over the eggs, ensuring they are fully submerged. If you’re using a container, you might need to gently press down on the eggs to keep them submerged. If using a zip-top bag, you can carefully squeeze out any excess air and then lay the bag flat in the refrigerator.
5. The Waiting Game (and the Reward!): Now comes the crucial waiting period. For the best flavor infusion, you’ll want to marinate your Ajitama for at least 4 hours, but 8 to 24 hours is ideal for a deeper flavor. The longer they marinate, the more savory and slightly sweet they will become. Flip the eggs periodically if they are in a container to ensure even marbling and color. Once they’ve marinated to your liking, they are ready to be enjoyed! Slice them in half lengthwise to reveal that beautiful, creamy yolk and add them to your favorite ramen, rice bowls, or any dish that needs a burst of deliciousness. They will keep in the refrigerator for up to 3 days. Enjoy your homemade ramen eggs!
Conclusion:
Making your own Ramen Eggs, or Ajitama, at home is surprisingly simple and incredibly rewarding! These marinated soft-boiled eggs are a game-changer for any ramen dish, elevating it from good to absolutely spectacular. The perfect balance of a creamy, jammy yolk and a savory, umami-rich marinade makes them a star ingredient that’s far more than just a topping. Their versatility extends beyond ramen too; imagin extracte them sliced over rice bowls, in salads, or even as a flavorful appetizer.
I highly encourage you to give this Ramen Eggs recipe a try. You’ll be amazed at how a few simple ingredients can transform an ordinary meal into something truly special. Don’t be afraid to experiment with the marinade – a touch more non-alcoholic mirin for sweetness, a dash of chili for heat, or even some grated gin extractger for an extra zing are all fantastic options. So go ahead, gather your ingredients, and get ready to enjoy the magic of homemade Ajitama!
Frequently Asked Questions:
How long do Ramen Eggs last in the refrigerator?
Once prepared, your Ramen Eggs will stay delicious in the refrigerator for up to 4-5 days. Make sure they are stored in an airtight container with some of their marinade to keep them fresh and flavorful.
Can I make the marinade ahead of time?
Absolutely! The marinade can be made up to a week in advance and stored in the refrigerator. This makes the actual egg-marinating process even quicker when you’re ready to assemble your ramen or other dishes.
What’s the best way to achieve a perfectly jammy yolk?
The key to a jammy yolk is precise timing. Boiling the eggs for exactly 6-7 minutes (depending on your stove and egg size) after they come to a rolling boil, followed by an immediate ice bath, is crucial. This rapid cooling stops the cooking process and results in that desirable creamy center.
Ramen Eggs (Ajitama)
Perfectly seasoned, soft-boiled eggs marinated in a savory soy-based broth, ideal for topping ramen or enjoying as a snack.
Ingredients
-
6 large eggs
-
1/2 cup soy sauce (light sodium)
-
1/4 cup water
-
1/4 cup non-alcoholic mirin
-
2 tablespoons granulated sugar
-
1 tablespoon rice vinegar (optional for boiling eggs)
Instructions
-
Step 1
Prepare the marinade: In a small saucepan, combine soy sauce, water, non-alcoholic mirin, and granulated sugar. Heat gently over medium heat, stirring until the sugar is dissolved. Let it cool completely. If using, add rice vinegar to the cooled marinade. -
Step 2
Boil the eggs: Bring a pot of water to a rolling boil. If using vinegar, add it to the boiling water. Gently lower the eggs into the boiling water using a slotted spoon. Boil for 6-7 minutes for a runny yolk, or 8-9 minutes for a jammy yolk. -
Step 3
Shock the eggs: Immediately transfer the boiled eggs to an ice bath for at least 10 minutes to stop the cooking process and make them easier to peel. -
Step 4
Peel the eggs: Carefully peel the cooled eggs. If they are difficult to peel, gently roll them on a hard surface to crack the shell all over, then peel under cool running water. -
Step 5
Marinate the eggs: Place the peeled eggs in a resealable bag or a container. Pour the cooled marinade over the eggs, ensuring they are fully submerged. Seal the bag or cover the container. -
Step 6
Chill: Refrigerate for at least 4 hours, or preferably overnight, to allow the flavors to fully penetrate the eggs. Turn the eggs occasionally for even marination.
Important Information
Nutrition Facts (Per Serving)
It is important to consider this information as approximate and not to use it as definitive health advice.
Allergy Information
Please check ingredients for potential allergens and consult a health professional if in doubt.