Easy Mongolian Beef Recipe- Flavorful & Quick Dinner
Mongolian Beef is a dish that has captured the hearts (and taste buds!) of so many, and for good reason. When I think about comfort food with an exciting kick, this is always one of the first things that comes to mind. What is it about this classic that makes it so universally adored? It’s that perfect harmony of sweet and savory, with a hint of spice that lingers just long enough to make you crave another bite. The tender, thinly sliced beef, coated in a glossy, deeply flavored sauce, is simply irresistible. It’s the kind of meal that transports you, offering a delicious escape from the everyday. We’re diving deep into how to create that authentic, mouthwatering Mongolian Beef experience right in your own kitchen, so get ready to impress yourself and everyone you share it with.
Why You’ll Love This Recipe
Get ready for restaurant-quality Mongolian Beef at home!
Ingredients:
Cooking Instructions:
The journey to achieving that coveted, glossy, and intensely flavorful Mongolian Beef right in your own kitchen begin extracts with meticulous preparation. Don’t be intimidated by the seemingly long ingredient list; each component plays a crucial role in building the complex yet balanced flavor profile we all know and love. Let’s dive into how we bring this restaurant-style favorite to life.
Marinating the Beef for Tenderness
The first critical step in creating truly delicious Mongolian Beef is to properly prepare the beef. This involves not only slicing it thinly but also a quick marinade that will tenderize the meat and help it absorb the delicious sauce later. In a medium bowl, combine the thinly sliced beef flank steak with 2 tablespoons of water, 2 teaspoons of Shaoxing rice vinegar, and ½ teaspoon of Kosher salt. The Shaoxing rice vinegar works its magic by slightly breaking down the muscle fibers, making the beef incredibly tender. Now, for a little secret weapon: the ¼ teaspoon of baking soda. Don’t skip this! Baking soda, when used in small quantities, helps to further tenderize the meat by raising its pH. Mix everything thoroughly to ensure each slice of beef is coated. Let this mixture sit at room temperature for about 15-20 minutes. While the beef is marinating, you can get your other ingredients prepped.
Coating the Beef for the Perfect Sear
After the beef has had its tenderizing soak, it’s time to coat it for that delightful crispiness. Drain any excess liquid from the beef. Add 2 tablespoons of cornstarch to the marinated beef and toss until every piece is evenly coated. This cornstarch coating is what will create a light, crispy exterior when the beef is fried, and it will also help thicken the sauce beautifully. It’s important to use cornstarch, not flour, as cornstarch gives a lighter, crispier result. Gently mix the cornstarch into the beef, ensuring no clumps form.
Preparing the Sauce and Aromatics
While the beef is coated, let’s get our sauce and aromatics ready. In a small bowl, whisk together 1 tablespoon of Shaoxing rice vinegar, 3 tablespoons of granulated sugar, and 2 tablespoons of regular soy sauce. This simple yet potent sauce base is the heart of Mongolian Beef’s flavor. Set this aside. Next, mince your garlic. We’ll also slice our yellow onion into thin strips and cut the green onions into roughly 2-inch pieces, making sure to separate the white parts of the green onions from the green leafy tops, as they will be added at different times for optimal flavor and texture. If you’re using the optional rice vermicelli, prepare it according to package directions. Typically, this involves soaking them in hot water for a few minutes until softened, then draining.
Stir-Frying for Flavor and Texture
Now for the main event: cooking! Heat 1 tablespoon of oil in a large skillet or wok over medium-high heat. Once the oil is shimmering, add the coated beef in a single layer. It’s important not to overcrowd the pan, so you might need to cook the beef in batches. This allows the beef to sear properly rather than steam. Fry for about 1-2 minutes per side, until golden brown and slightly crispy. The beef will not be fully cooked through at this stage; it will finish cooking in the sauce. Remove the browned beef from the skillet and set it aside on a plate.
Building the Flavor Base
In the same skillet (don’t wipe it clean, the residual oil and beef bits add flavor!), add a tiny bit more oil if needed. Add the sliced yellow onion and the white parts of the green onions. Stir-fry for about 1-2 minutes until they start to soften and become fragrant. Then, add the minced garlic and 1 teaspoon of cracked black pepper. Stir-fry for another 30 seconds until the garlic is fragrant, being careful not to burn it. The aroma at this stage is incredible!
Simmering to Perfection
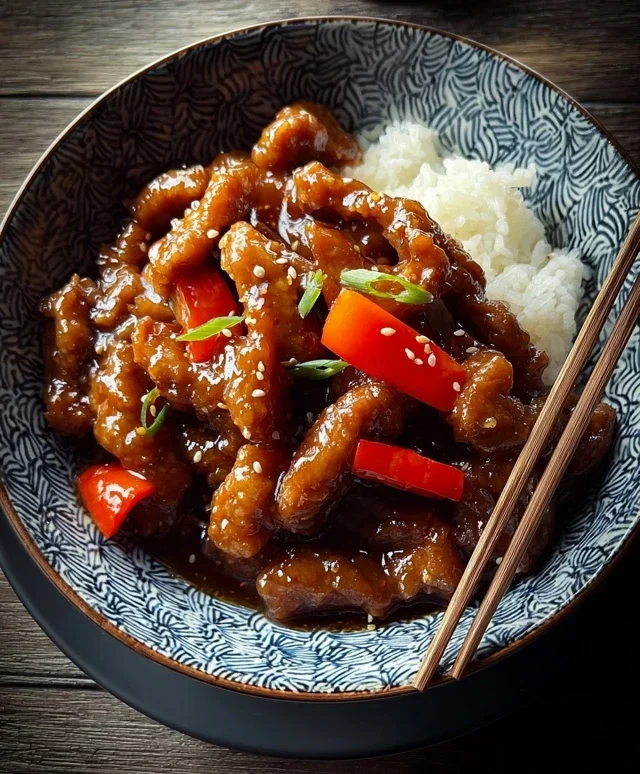
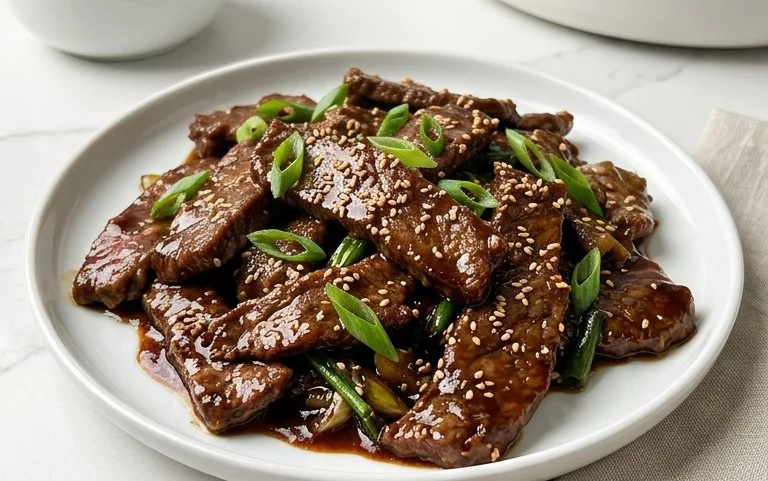
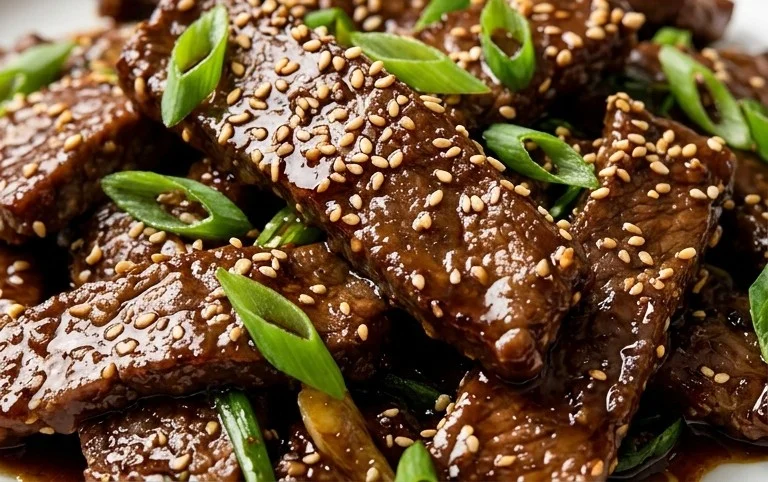
Pour the prepared sauce mixture into the skillet with the onions and garlic. Stir well to combine and bring the sauce to a gentle simmer. Let it bubble for about 1 minute to allow the sugar to dissolve and the flavors to meld. Now, return the browned beef to the skillet. Toss the beef in the sauce until it’s well coated. Continue to cook for another 2-3 minutes, or until the beef is cooked through and the sauce has thickened beautifully, coating each piece of beef with a glossy sheen. If you’re using the rice vermicelli, you can toss them in now as well, ensuring they are coated with the sauce. Finally, add the green leafy parts of the green onions and give everything a final toss. Serve immediately over rice, or as is, for a truly satisfying meal. Enjoy the fruits of your labor!
Conclusion:
And there you have it – your guide to crafting restaurant-quality Mongolian Beef right in your own kitchen! This recipe truly shines because it balances that irresistible sweet and savory sauce with tender, marinated beef and a delightful crisp texture. It’s surprisingly straightforward to make, proving that authentic flavors don’t always require a special trip. I absolutely love how adaptable it is. For a complete meal, I highly recommend serving it over steamed white or brown rice, or even some fluffy cauliflower rice for a lighter option. Don’t hesitate to add some vibrant stir-fried vegetables like broccoli, bell peppers, or snap peas for extra color and nutrients. If you’re feeling adventurous, you could even try substituting thinly sliced flank steak or sirloin for an equally delicious result. Give this Mongolian Beef recipe a try – I’m confident you’ll be hooked!
Frequently Asked Questions:
What is the best cut of beef for Mongolian Beef?
For the most tender and flavorful Mongolian Beef, I recommend using thinly sliced flank steak or sirloin. These cuts marinate beautifully and cook up incredibly tender when stir-fried quickly.
Can I make the sauce ahead of time?
Absolutely! The sauce can be prepared a day or two in advance and stored in an airtight container in the refrigerator. This makes the actual cooking process even faster when you’re ready to serve.
How can I make this recipe spicier?
To add some heat to your Mongolian Beef, you can easily incorporate red pepper flakes into the sauce while it’s simmering. Alternatively, a drizzle of sriracha or a few thinly sliced fresh chilies added during the stir-fry stage will do the trick!
Mongolian Beef
A quick and flavorful Mongolian Beef recipe, adapted for common pantry staples.
Ingredients
-
{‘@type’: ‘Ingredient’, ‘name’: ‘beef flank steak’, ‘description’: ‘thinly sliced (between ⅛ to ¼ inch thick)’, ‘quantity’: ‘1’, ‘unitCode’: ‘pound’}
-
{‘@type’: ‘Ingredient’, ‘name’: ‘water’, ‘quantity’: ‘2’, ‘unitCode’: ‘tablespoon’}
-
{‘@type’: ‘Ingredient’, ‘name’: ‘white wine vinegar’, ‘quantity’: ‘2’, ‘unitCode’: ‘teaspoon’}
-
{‘@type’: ‘Ingredient’, ‘name’: ‘Kosher salt’, ‘description’: ‘a little less if using fine salt’, ‘quantity’: ‘½’, ‘unitCode’: ‘teaspoon’}
-
{‘@type’: ‘Ingredient’, ‘name’: ‘baking soda’, ‘quantity’: ‘¼’, ‘unitCode’: ‘teaspoon’}
-
{‘@type’: ‘Ingredient’, ‘name’: ‘cornstarch’, ‘quantity’: ‘2’, ‘unitCode’: ‘tablespoon’}
-
{‘@type’: ‘Ingredient’, ‘name’: ‘neutral oil’, ‘quantity’: ‘1’, ‘unitCode’: ‘tablespoon’}
-
{‘@type’: ‘Ingredient’, ‘name’: ‘cracked black pepper’, ‘description’: ‘more or less to taste’, ‘quantity’: ‘1’, ‘unitCode’: ‘teaspoon’}
-
{‘@type’: ‘Ingredient’, ‘name’: ‘white wine vinegar’, ‘quantity’: ‘1’, ‘unitCode’: ‘tablespoon’}
-
{‘@type’: ‘Ingredient’, ‘name’: ‘granulated sugar’, ‘quantity’: ‘3’, ‘unitCode’: ‘tablespoon’}
-
{‘@type’: ‘Ingredient’, ‘name’: ‘regular soy sauce’, ‘quantity’: ‘2’, ‘unitCode’: ‘tablespoon’}
-
{‘@type’: ‘Ingredient’, ‘name’: ‘garlic’, ‘description’: ‘minced (about 2 cloves)’, ‘quantity’: ‘1’, ‘unitCode’: ‘tablespoon’}
-
{‘@type’: ‘Ingredient’, ‘name’: ‘yellow onion’, ‘description’: ‘sliced’, ‘quantity’: ‘½’, ‘unitCode’: ‘large’}
-
{‘@type’: ‘Ingredient’, ‘name’: ‘green onion’, ‘description’: ‘cut into 2 inch pieces (separate the white and green parts)’, ‘quantity’: ‘1’, ‘unitCode’: ‘bunch’}
-
{‘@type’: ‘Ingredient’, ‘name’: ‘rice vermicelli’, ‘description’: ‘medium thickness (optional; use more or less to preference)’, ‘quantity’: ‘1’, ‘unitCode’: ‘ounce’}
Instructions
-
Step 1
In a medium bowl, combine the thinly sliced beef with 2 tablespoons water, 2 teaspoons white wine vinegar, Kosher salt, and baking soda. Mix well and let it sit for 10 minutes. Then, stir in the cornstarch and black pepper until the beef is evenly coated. -
Step 2
In a small bowl, whisk together 1 tablespoon white wine vinegar, granulated sugar, and regular soy sauce to create the sauce. Set aside. -
Step 3
Heat 1 tablespoon of oil in a wok or large skillet over high heat until shimmering. Add the coated beef in a single layer and cook for 1-2 minutes per side until browned. Remove beef from the wok and set aside. -
Step 4
Add the sliced yellow onion and the white parts of the green onions to the wok. Stir-fry for 1-2 minutes until slightly softened. -
Step 5
Add the minced garlic and stir-fry for 30 seconds until fragrant. -
Step 6
Pour the prepared sauce into the wok and bring to a simmer, stirring constantly until it thickens slightly. Return the cooked beef to the wok and toss to coat evenly with the sauce. -
Step 7
Add the green parts of the green onions and the optional rice vermicelli. Stir-fry for another minute until everything is heated through and combined. Serve immediately.
Important Information
Nutrition Facts (Per Serving)
It is important to consider this information as approximate and not to use it as definitive health advice.
Allergy Information
Please check ingredients for potential allergens and consult a health professional if in doubt.