Easy Mini Cannoli Cups- Delicious Dessert Treat
Mini cannoli cups are the quintessential Italian treat, shrunk down to a perfect, bite-sized marvel. Who can resist those crisp, golden shells bursting with a creamy, sweet ricotta filling? I know I can’t! There’s something incredibly satisfying about the contrast in textures and the delicate balance of sweetness that makes cannoli so universally adored. But let’s be honest, traditional cannoli can be a bit intimidating to make at home. That’s where these delightful mini cannoli cups come in. They capture all the magic of the origin extractal without the fuss, making them an approachable and incredibly rewarding dessert. You get that authentic, delightful cannoli flavor and charm in a form that’s perfect for parties, afternoon tea, or just a little self-indulgent treat. Get ready to impress yourself and your loved ones with these adorable mini cannoli cups!
Mini Cannoli Cups
Craving the classic crisp shell and creamy, sweet filling of cannoli, but don’t have the time or inclination to tackle traditional cannoli tubes? You’re in luck! These Mini Cannoli Cups offer all the delightful flavors of a traditional cannoli in a wonderfully easy-to-make package. We’re going to leverage the convenience of refrigerated pie crusts to create edible cups that are baked to golden perfection, then filled with a luscious ricotta mixture. This recipe is perfect for a quick dessert, a party appetizer, or just when a sweet craving strikes. Get ready to impress yourself and your loved ones with these delightful bite-sized treats!
Ingredients:
Preparing the Ricotta Filling
The heart of any cannoli is its creamy filling, and ours is no exception. The key to a wonderfully smooth and flavorful filling is starting with well-drained ricotta. Excess moisture can make the filling watery, so it’s worth taking that extra step. You can drain ricotta by placing it in a fine-mesh sieve set over a bowl for at least an hour, or even overnight in the refrigerator. Once drained, we’ll combine it with the sugars, citrus zest, and vanilla. The citrus zest adds a bright, aromatic note that beautifully complements the sweetness of the ricotta. Don’t skip this ingredient – it makes a world of difference! Feel free to use orange or lemon zest, or even a blend of both, depending on your preference. The vanilla extract adds that comforting, classic sweetness.
Creating the Edible Cups
This is where the magic of the refrigerated pie crust comes in. We’re going to transform these readily available crusts into our crunchy cannoli cups. First, ensure your pie crusts are softened according to the package directions. This makes them pliable and easy to work with. We’ll be cutting rounds from the pie crusts and then pressing them into a mini muffin tin. A round cookie cutter or even a small glass can be used to cut out the circles. The size of your circles will depend on the size of your mini muffin tin’s wells; you want them large enough to line the bottom and come up the sides slightly. Once the crusts are cut, gently press each round into the greased and floured wells of your mini muffin tin, ensuring they fit snugly. We want to create little edible bowls that will hold our delicious filling.
Baking the Crusts to Golden Perfection
Now it’s time to bake our pie crust “cups” until they’re golden brown and crisp. This is a crucial step for achieving that satisfying crunch. Before they go into the oven, we’ll give them a little extra flavor and texture. In a small bowl, combine the turbinado sugar and ground cinnamon. This mixture will be sprinkled over the tops of the uncooked pie crust cups. The turbinado sugar will caramelize as it bakes, adding a delightful crunch and a hint of molasses flavor, while the cinnamon brings warmth. Bake these in a preheated oven at the temperature recommended on your pie crust package, usually around 375°F (190°C). Keep a close eye on them, as they can go from golden to burnt quickly. They should be beautifully browned and firm to the touch. Once baked, let them cool in the muffin tin for a few minutes before carefully removing them to a wire rack to cool completely. This allows them to set up properly and ensures maximum crispness.
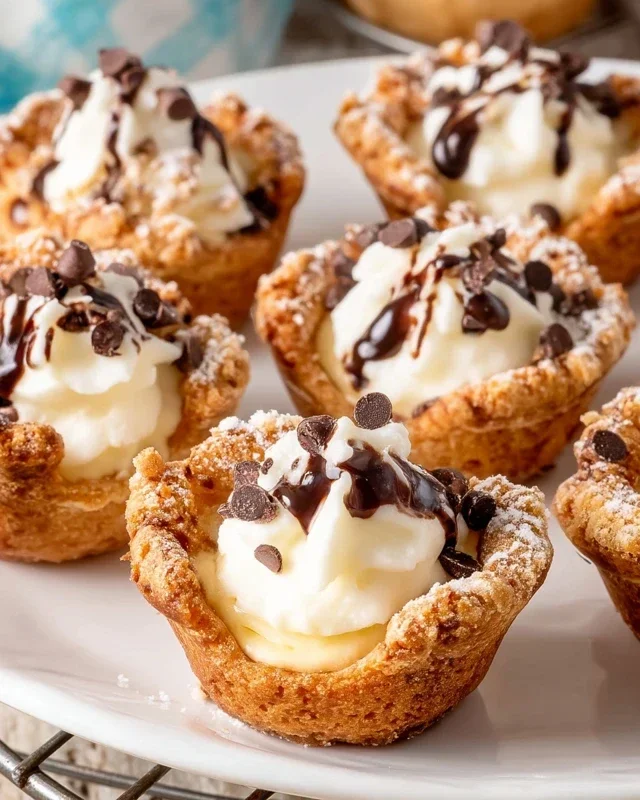
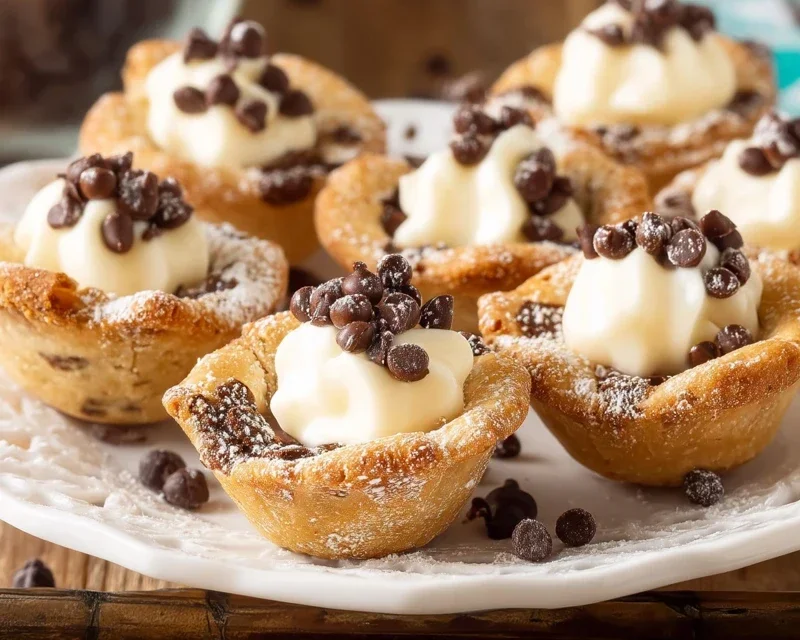
Assembling Your Mini Cannoli Cups
With our crispy shells cooled and our creamy filling ready, the final step is assembly. Gently spoon or pipe the ricotta filling into each cooled pie crust cup. Don’t overfill them, but make sure they are generously filled for that authentic cannoli experience. You can use a spoon, but a piping bag with a plain tip makes for a neater and more professional-looking finish. Finally, garnish your mini cannoli cups. A sprinkle of miniature semisweet chocolate chips or finely chopped pistachios is traditional and adds a lovely textural contrast and visual appeal. You can also dust them with a little extra powdered sugar for a final touch of elegance.
Tips for Success and Variations
Enjoy these delightful Mini Cannoli Cups – a simple yet elegant way to enjoy a classic Italian dessert!
Conclusion:
There you have it – a simple yet utterly delightful recipe for Mini Cannoli Cups! These little bites of heaven are perfect for satisfying your sweet cravings without the fuss of traditional cannoli rolling. The crisp, golden shells, when paired with the creamy, sweet ricotta filling, create a textural and flavor explosion that’s simply irresistible. They’re not only visually appealing, making them a fantastic addition to any dessert table or party spread, but they’re also incredibly customizable. I truly hope you’ll give these Mini Cannoli Cups a try. They’re a project that brings a lot of joy, both in the making and the devouring!
For serving, I love presenting them on a tiered stand, allowing guests to easily pick their own. They’re also wonderful as a small, elegant dessert after a special meal. Don’t be afraid to get creative with the toppings! Beyond the classic chocolate chips, consider finely chopped pistachios, a dusting of powdered sugar, a drizzle of caramel sauce, or even some colorful sprinkles for a festive touch.
Frequently Asked Questions:
Can I make the cannoli shells ahead of time?
Yes, absolutely! The shells can be baked a day or two in advance and stored in an airtight container at room temperature. Make sure they are completely cooled before storing to prevent them from becoming soggy.
What if I don’t have ricotta cheese?
While ricotta is traditional, you can substitute it with mascarpone cheese for an even richer filling. Some people also have success with a cream cheese-based filling, though the flavor profile will be different.
How long will the filled mini cannoli cups last?
For the best texture, it’s recommended to fill your mini cannoli cups just before serving, or within a few hours. If you need to prepare them further in advance, store the filling separately and fill the shells right before you plan to enjoy them.
Mini Cannoli Cups
A simplified and delightful take on classic cannoli, made in bite-sized cup form. Perfect for parties and as a sweet treat.
Ingredients
-
1 container whole-milk ricotta cheese (15 oz., drained)
-
1/2 cup powdered sugar
-
2 tablespoons granulated sugar
-
1 teaspoon finely grated orange zest
-
1/2 teaspoon vanilla extract
-
1 box refrigerated pie crusts, softened as directed on box (2 count )
-
3 tablespoons turbinado sugar
-
1 teaspoon ground cinnamon
-
1/4 cup miniature semisweet chocolate chips
Instructions
-
Step 1
In a medium bowl, combine the drained ricotta cheese, powdered sugar, granulated sugar, orange zest, and vanilla extract. Stir until well combined and creamy. Fold in the chocolate chips. -
Step 2
Preheat your oven to 375°F (190°C). -
Step 3
Unroll the refrigerated pie crusts. Use a round cookie cutter (about 3 inches) to cut out circles from the dough. -
Step 4
Gently press the dough circles into the cups of a mini muffin tin, forming little cups. Prick the bottom of each crust with a fork. -
Step 5
Bake for 10-12 minutes, or until lightly golden brown. Let them cool completely in the muffin tin before carefully removing them. -
Step 6
In a small bowl, mix the turbinado sugar and ground cinnamon. -
Step 7
Once the crusts are cooled, spoon the ricotta filling into each mini cannoli cup. Sprinkle with the cinnamon-sugar mixture and additional powdered sugar, if desired.
Important Information
Nutrition Facts (Per Serving)
It is important to consider this information as approximate and not to use it as definitive health advice.
Allergy Information
Please check ingredients for potential allergens and consult a health professional if in doubt.