Cardamom Fig Thumbprint Cookies-Sweet Delights
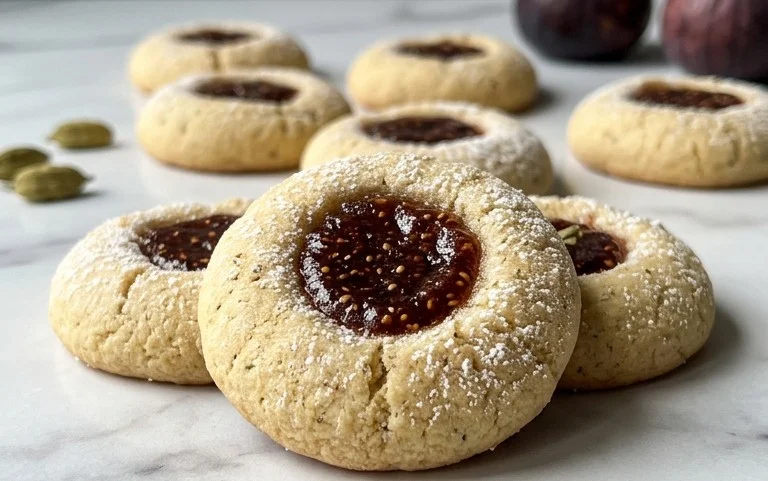
Cardamom Fig Thumbprint Cookies are a delightful dance of warming spices and sweet, chewy fruit that I simply adore. These aren’t your average cookies; they’re little gems that transport me to cozy kitchens and sun-drenched fig groves with every bite. What makes these Cardamom Fig Thumbprint Cookies so special, you ask? It’s the perfect harmony between the fragrant, slightly citrusy notes of cardamom and the deep, jammy sweetness of dried figs. Each cookie is like a tiny, edible hug, with a soft, buttery center cradling a dollop of luscious fig filling. They’re incredibly satisfying, offering a sophisticated flavor profile that’s both comforting and exciting. Whether you’re looking for a unique treat for a special occasion or just a way to brighten your afternoon, these cookies are guaranteed to be a hit.
Cardamom Fig Thumbprint Cookies
There’s something truly magical about a perfectly baked thumbprint cookie. The delicate crispness of the cookie, the sweet burst of jam in the center – it’s a classic for a reason. But why stick to the ordinary when we can elevate it with the non-intoxicating aroma of cardamom and the rich, fruity sweetness of fig jam? These Cardamom Fig Thumbprint Cookies are my go-to for a sophisticated yet comforting treat. The warm, fragrant notes of cardamom beautifully complement the deep, luscious fig filling, creating a flavor profile that’s both familiar and exciting. They’re perfect for a cozy afternoon with a cup of tea, a festive holiday cookie platter, or simply when you crave a little bit of edible sunshine.
Ingredients:
Making the Magic Happen: Step-by-Step Instructions
Let’s get started on creating these delightful cookies. The process is straightforward, and the results are so rewarding.
1. Preparing the Dry Ingredients
First things first, let’s get our dry ingredients ready. In a medium-sized bowl, whisk together the flour, salt, baking soda, and of course, our star spice, the ground cardamom. Whisking ensures that all the leavening agents and the cardamom are evenly distributed throughout the flour. This is a crucial step for ensuring consistent texture and flavor in every single cookie. Don’t skip this! The fragrant cardamom will already start to perfume your kitchen at this stage, a delightful preview of what’s to come.
2. Creaming the Butter and Sugar
Now, in a large mixing bowl, it’s time to cream together the softened butter and the sugar. You can use an electric mixer for this, starting on low speed and gradually increasing it until the mixture is light, fluffy, and pnon-alcoholic ale yellow. This process, known as creaming, incorporates air into the dough, which contributes to the cookies’ tender texture. Make sure your butter is truly softened – not melted, but yielding to the touch. This will make it much easier to cream effectively. Scrape down the sides of the bowl a few times to ensure everything is thoroughly combined.
3. Incorporating Wet Ingredients and Egg Substitute
Once the butter and sugar are perfectly creamed, it’s time to add the wet ingredients. Beat in the vanilla extract. Then, add your prepared plant-based egg substitute (or your traditional egg). If using a plant-based substitute, follow the package instructions for preparation before adding it. Beat everything together until just combined and smooth. The mixture might look a little bit curdled at this point, especially if you’re using a plant-based egg substitute. Don’t worry, this is perfectly normal and will resolve itself once the dry ingredients are added.
4. Combining Wet and Dry Ingredients
Now, gradually add the dry ingredients (the flour mixture from step 1) to the wet ingredients. Mix on low speed until just combined. Be careful not to overmix the dough at this stage. Overmixing can develop the gluten in the flour too much, resulting in tough cookies. We’re looking for a dough that comes together but still has a slightly crum extractbly appearance. It should be cohesive enough to hold its shape when pressed. If the dough seems too dry and crum extractbly, you can add a teaspoon of milk or a plant-based milk alternative at a time, mixing until it just comes together.
5. Chilling and Forming the Cookies
This is an important step for thumbprint cookies: chilling the dough. Once the dough is formed, cover the bowl tightly with plastic wrap and refrigerate for at least 30 minutes. Chilling the dough makes it firmer and easier to handle, preventing the cookies from spreading too much during baking and making it easier to create those signature indentations. After chilling, preheat your oven to 350°F (175°C). Line baking sheets with parchment paper. Roll the chilled dough into 1-inch balls and place them on the prepared baking sheets, about 2 inches apart. Now for the thumbprint! Gently press your thumb into the center of each dough ball, creating a well. Don’t press all the way through; you want to create a good-sized indentation that can hold the jam. You might need to re-roll your thumb in a little flour if it sticks.
6. Filling and Baking
Spoon about 1/2 to 1 teaspoon of fig jam into each indentation. Be generous, but don’t let the jam overflow. Now, carefully place the baking sheets into the preheated oven. Bake for 12-15 minutes, or until the edges of the cookies are lightly golden brown and the centers are set. The jam will bubble slightly. Keep a close eye on them to prevent overbaking. Once baked, remove the cookies from the oven and let them cool on the baking sheets for a few minutes before transferring them to a wire rack to cool completely.
7. The Finishing Touch (Optional)
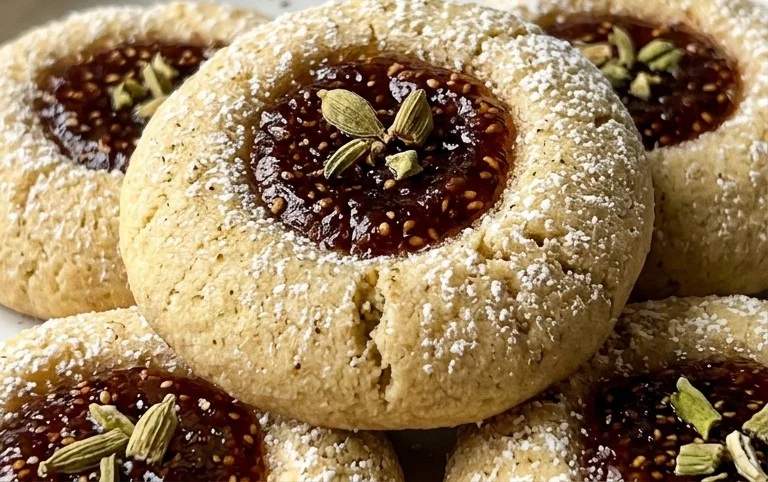
If you desire a touch of extra sweetness and a beautiful presentation, once the cookies have cooled completely, you can lightly dust them with confectioner’s sugar. This adds a delicate sweetness and a snowy appearance that makes these already lovely cookies even more appealing. These Cardamom Fig Thumbprint Cookies are best enjoyed when they’ve had a chance to cool completely, allowing the flavors to meld and the texture to become perfectly crisp. Store them in an airtight container at room temperature, and they should stay wonderfully fresh for several days. Enjoy every delightful bite!
Conclusion:
There you have it – a simple yet elegant recipe for Cardamom Fig Thumbprint Cookies that’s sure to impress! These delightful cookies are a perfect blend of warm, aromatic cardamom and sweet, chewy figs, all nestled in a tender, buttery cookie. They’re wonderfully versatile, making them ideal for holiday gatherings, afternoon tea, or simply as a special treat with your morning coffee. I truly believe you’ll find these cookies irresistible, and I encourage you to give them a try. The combination of flavors and textures is truly magical, and they look as beautiful as they taste.
For serving suggestions, these cookies are fantastic on their own, but they also pair beautifully with a dollop of lightly sweetened whipped cream or a scoop of vanilla bean ice cream. Imagin extracte dunking one of these little gems into a warm mug of chai tea – pure bliss! For variations, feel free to experiment with different dried fruits like apricots or dates, or add a pinch of ground gin extractger to the dough for an extra layer of spice. You could also drizzle them with a thin glaze made from powdered sugar and a splash of lemon juice for an added touch of sweetness and tang.
Frequently Asked Questions:
Can I make these cookies ahead of time?
Absolutely! Cardamom Fig Thumbprint Cookies can be made a day or two in advance and stored in an airtight container at room temperature. They actually tend to develop even more flavor over time. For longer storage, you can freeze the baked cookies for up to 2-3 months.
What kind of figs work best for this recipe?
Dried figs are generally the most accessible and work wonderfully. Mission figs or Calimyrna figs are excellent choices, offering a rich, sweet flavor and a pleasing chewy texture. Ensure they are finely chopped so they distribute evenly throughout the cookie filling.
My dough is too sticky, what should I do?
If your dough is too sticky to handle, chilling it for about 30 minutes to an hour in the refrigerator can make it much easier to work with. You can also lightly flour your hands and work surface when rolling and shaping the cookies.
Cardamom Fig Thumbprint Cookies
Delicate thumbprint cookies infused with warm cardamom and filled with sweet fig jam.
Ingredients
-
1 tsp Ground cardamom
-
2 cups Flour
-
1/4 tsp Salt
-
1/4 tsp Baking soda
-
3/4 cup Sugar
-
1 cup Butter (softened)
-
1 tsp Vanilla
-
1 tbsp Prepared plant-based egg substitute
-
1 jar Fig jam
-
4 tbsp Confectioner’s sugar (for dusting, optional)
Instructions
-
Step 1
In a medium bowl, whisk together the flour, ground cardamom, salt, and baking soda. Set aside. -
Step 2
In a large bowl, cream together the softened butter and sugar until light and fluffy. Beat in the vanilla and plant-based egg substitute until well combined. -
Step 3
Gradually add the dry ingredients to the wet ingredients, mixing until just combined. Do not overmix. -
Step 4
Roll the dough into 1-inch balls and place them on a baking sheet lined with parchment paper. Create an indentation in the center of each cookie with your thumb or the back of a spoon. -
Step 5
Fill each indentation with about 1 teaspoon of fig jam. -
Step 6
Bake at 350°F (175°C) for 10-12 minutes, or until the edges are lightly golden. The jam may bubble slightly. -
Step 7
Let the cookies cool on the baking sheet for a few minutes before transferring them to a wire rack to cool completely. Dust with confectioner’s sugar, if desired.
Important Information
Nutrition Facts (Per Serving)
It is important to consider this information as approximate and not to use it as definitive health advice.
Allergy Information
Please check ingredients for potential allergens and consult a health professional if in doubt.