Easy French Dip Squares Recipe
French Dip Squares are about to become your new favorite comfort food obsession. Imagin extracte all the rich, savory goodness of a classic French Dip sandwich, but reimagin extracted into an unbelievably delicious and easy-to-make square. Who doesn’t adore that tender, slow-cooked roast beef, bathed in a deeply flavorful au jus, all embraced by warm, crusty bread? It’s a flavor profile that has stood the test of time, evoking cozy meals and satisfying cravings. What makes these French Dip Squares truly special is the ingenious way we’ve captured that iconic taste in a convenient, bite-sized format. Perfect for game days, potlucks, or just a weeknight indulgence, this recipe takes the beloved French Dip experience and elevates it into something entirely new and utterly irresistible. Get ready to impress yourself and everyone you share them with!

French Dip Squares
Looking for a delightful twist on a classic sandwich? These French Dip Squares are the answer! Imagin extracte all the savory, comforting flavors of a French Dip sandwich, but baked into easy-to-share, irresistible squares. Perfect for game nights, potlucks, or just a cozy weeknight dinner, these squares deliver that rich roast beef and melty Swiss cheese goodness, all elevated by a flavorful broth for dipping. They’re surprisingly simple to make and guaranteed to disappear in a flash. Let’s get cooking!
Ingredients:
Making Your French Dip Squares
Step 1: Preparing the Base
The foundation of our delicious French Dip Squares starts with the crescent rolls. Preheat your oven to 375 degrees Fahrenheit (190 degrees Celsius). Lightly grease a 9×13 inch baking dish. Now, carefully unroll both cans of crescent rolls onto a clean surface. You’ll notice they come in perforated triangles. Gently press the seams of the triangles together to form a solid sheet of dough. This is crucial for creating a sturdy base that won’t fall apart when you cut into your squares. You want to cover the entire bottom of your prepared baking dish with this crescent roll dough, pressing it up slightly around the edges to create a small lip. This little lip will help contain the delicious filling.
Step 2: Layering the Savory Filling
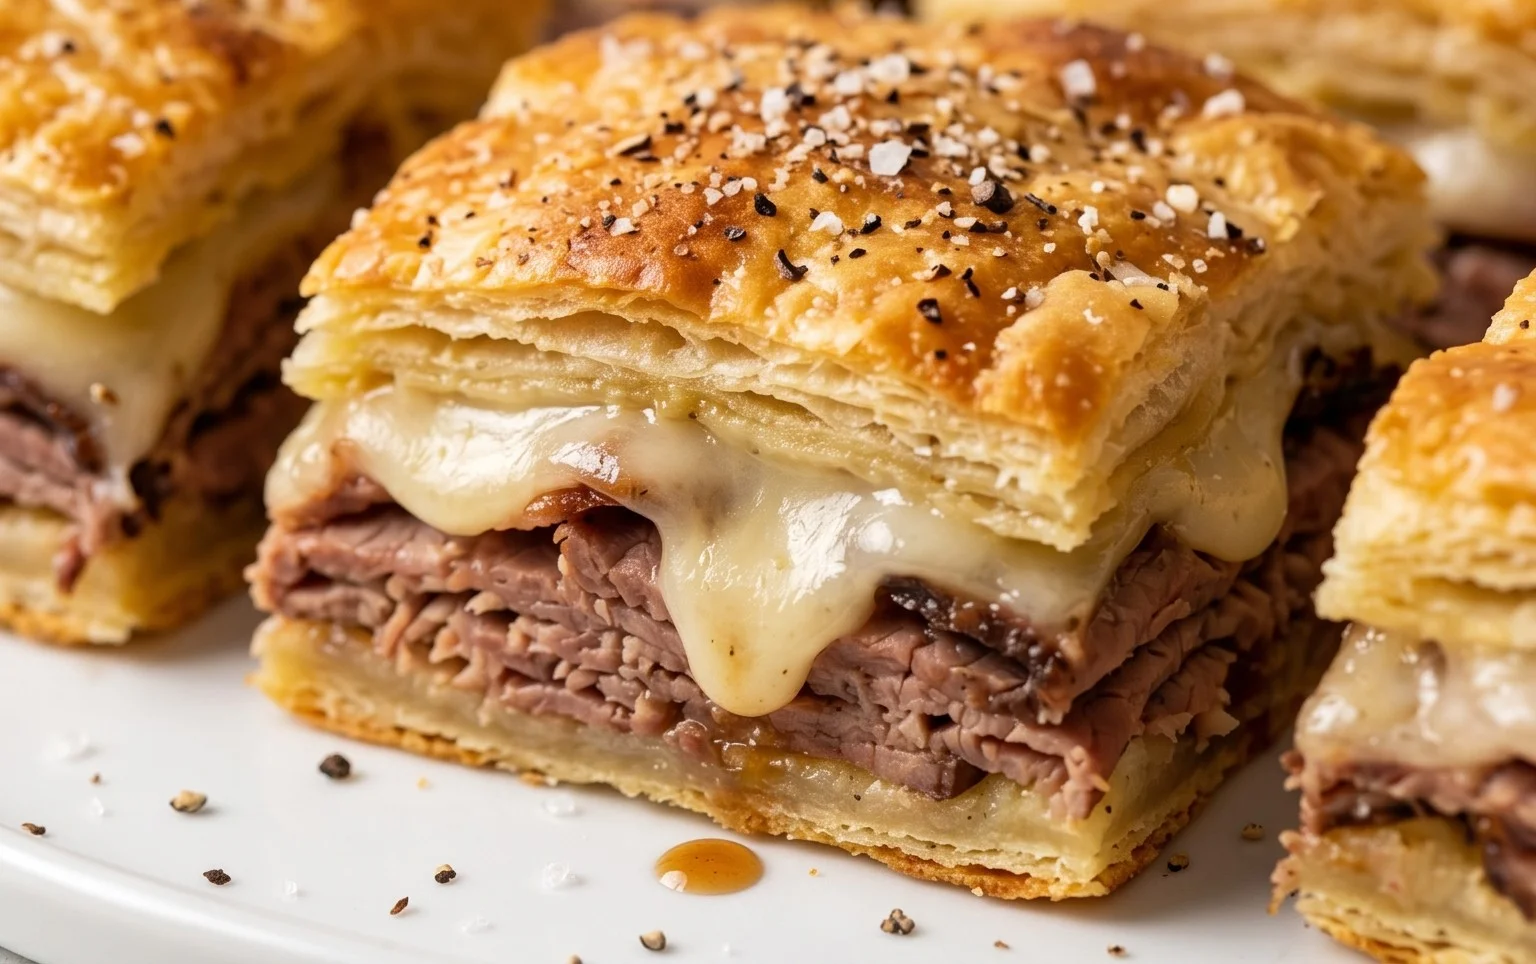
This is where the classic French Dip flavor really starts to come together. In a medium bowl, combine the deli-sliced roast beef. It’s best to roughly chop or tear the roast beef into smaller, bite-sized pieces. This will ensure an even distribution of beef throughout the squares. Next, add the grated Swiss cheese. Swiss cheese is a fantastic choice here because of its nutty flavor and excellent melting capabilities, which perfectly complements the roast beef. Now, let’s add the flavor boosters. Sprinkle the entire packet of dry onion soup mix over the roast beef and cheese. This is a secret weapon for deep, savory flavor. Give it all a gentle toss to combine. Don’t overmix; you just want everything distributed nicely.
Step 3: Assembling and Enhancing the Flavor
Once your beef and cheese mixture is ready, carefully spread it evenly over the prepared crescent roll base in the baking dish. Try to get an even layer so every square has a good amount of filling. Now, for the magical butter mixture that ties everything together. In a small bowl, whisk together the 1/4 cup of melted butter, 1 teaspoon of Worcestershire sauce, and 1/2 teaspoon of garlic powder. Worcestershire sauce adds a wonderful depth of umami, while the garlic powder provides a subtle aromatic kick. Drizzle this flavorful butter mixture evenly over the roast beef and cheese layer. Ensure it covers as much of the surface area as possible, as this will help to create a beautifully golden and flavorful crust on top.
Step 4: Baking to Golden Perfection
Now it’s time to bake these beauties! Place the prepared baking dish into your preheated oven. Bake for 20-25 minutes, or until the crescent roll dough is puffed up and golden brown around the edges, and the Swiss cheese is melted and bubbly. Keep an eye on them during the last few minutes of baking to prevent over-browning. The aroma that will fill your kitchen at this stage is simply divine! The combination of warm dough, savory beef, and melted cheese is truly irresistible. Once they’re done, carefully remove the baking dish from the oven and let them rest for about 5-10 minutes. This resting period is important. It allows the filling to set slightly, making it much easier to cut into neat squares and preventing the filling from oozing out too much.
Step 5: The Essential Dipping Broth
No French Dip experience is complete without a flavorful dipping broth. While your squares are resting, prepare your dipping station. Pour the 1 cup of beef broth into a small, oven-safe bowl or ramekin. You can warm the beef broth slightly in the microwave or on the stovetop if you prefer a warmer dip. This warm, savory broth is the perfect accompaniment, adding an extra layer of moisture and flavor to each bite. It’s the final touch that makes these squares truly exceptional.
Serving Your French Dip Squares
Once the French Dip Squares have rested, use a sharp knife or a pizza cutter to slice them into individual squares. You can aim for roughly 6-8 squares, depending on how large you want them. Serve them warm, with the prepared beef broth on the side for dipping. Encourage everyone to dip generously! These are best enjoyed immediately while they are warm and the cheese is still gooey. They are incredibly satisfying and offer a unique way to enjoy the beloved flavors of a French Dip. Enjoy this easy, delicious, and crowd-pleasing treat!
Conclusion:
There you have it – the ultimate guide to creating delectable French Dip Squares! These savory little bites are a game-changer for weeknight dinners, potlucks, or even a sophisticated appetizer. The magic lies in their perfect balance of tender roast beef, melty cheese, and the irresistible, flavorful au jus for dipping. They’re incredibly satisfying, surprisingly easy to assemble, and guaranteed to impress everyone who tries them.
I love serving these French Dip Squares alongside a crisp green salad for a complete meal. They also make a fantastic addition to a buffet or game day spread. For variations, consider adding caramelized onions or a sprinkle of Dijon mustard to the filling for an extra layer of flavor. Don’t be afraid to experiment! I truly encourage you to give these French Dip Squares a try; I know you’ll fall in love with them just like I have!
Frequently Asked Questions about French Dip Squares:
Can I make these French Dip Squares ahead of time?
Absolutely! You can assemble the squares up to 24 hours in advance. Store them covered in the refrigerator. When you’re ready to bake, you might need to add a few extra minutes to the baking time since they’ll be starting from chilled.
What kind of roast beef works best?
For the best flavor and texture, I recommend using thinly sliced deli roast beef. You can also use leftover roast beef from a home roast, as long as it’s tender and sliced thinly. Avoid overly fatty cuts, as they can make the squares greasy.
Can I freeze the French Dip Squares?
Yes, you can freeze the assembled, unbaked French Dip Squares. Once assembled, place them on a baking sheet and freeze until firm. Then, transfer them to an airtight container or freezer bag. When you’re ready to bake, thaw them completely in the refrigerator before baking, adding a bit of extra time to the baking process.
French Dip Squares
Easy and delicious French Dip Squares made with crescent rolls, roast beef, and Swiss cheese, perfect for a quick meal or appetizer.
Ingredients
-
2 cans refrigerated crescent rolls
-
1/2 pound deli-sliced roast beef
-
1 cup grated Swiss cheese
-
1 packet dry onion soup mix
-
1/4 cup melted butter
-
1 teaspoon Worcestershire sauce
-
1/2 teaspoon garlic powder
-
1 cup beef broth (for dipping)
Instructions
-
Step 1
Preheat oven to 375°F (190°C). Grease a 9×13 inch baking dish. -
Step 2
Unroll one can of crescent rolls and press into the bottom of the prepared baking dish to form a crust. Do not separate the triangles. -
Step 3
Layer the deli-sliced roast beef evenly over the crescent roll crust. -
Step 4
In a small bowl, combine melted butter, Worcestershire sauce, garlic powder, and the dry onion soup mix. Pour this mixture evenly over the roast beef. -
Step 5
Sprinkle the grated Swiss cheese over the roast beef and onion mixture. -
Step 6
Unroll the second can of crescent rolls and place on top of the cheese layer. Pinch the seams together to seal. -
Step 7
Bake for 20-25 minutes, or until the crescent roll topping is golden brown and the cheese is melted and bubbly. -
Step 8
While the squares are baking, warm the beef broth in a small saucepan or microwave for dipping. -
Step 9
Cut the baked squares into individual portions and serve immediately with warm beef broth for dipping.
Important Information
Nutrition Facts (Per Serving)
It is important to consider this information as approximate and not to use it as definitive health advice.
Allergy Information
Please check ingredients for potential allergens and consult a health professional if in doubt.