Simple Fruit Curd Recipe – Delicious & Easy Citrus Treat
Fruit curd is one of those magical creations that transforms simple ingredients into something truly extraordinary. Have you ever experienced that silken, intensely flavored custard, bursting with the bright tang of citrus or the sweet perfume of berries? That, my friends, is the sheer delight of fruit curd. It’s a classic for a reason – its versatility knows no bounds, whether you’re dolloping it onto warm scones, swirling it into yogurt, or using it as a luscious filling for tarts and cakes. What makes fruit curd so utterly special is its pure, unadulterated flavor. Unlike many desserts, it’s not overly sweet; instead, the natural tartness of the fruit shines through, creating a perfectly balanced treat that’s both refreshing and decadent. I’m so excited to share my favorite methods for achieving that perfect, glossy texture every time. Get ready to fall in love with making your own fruit curd!
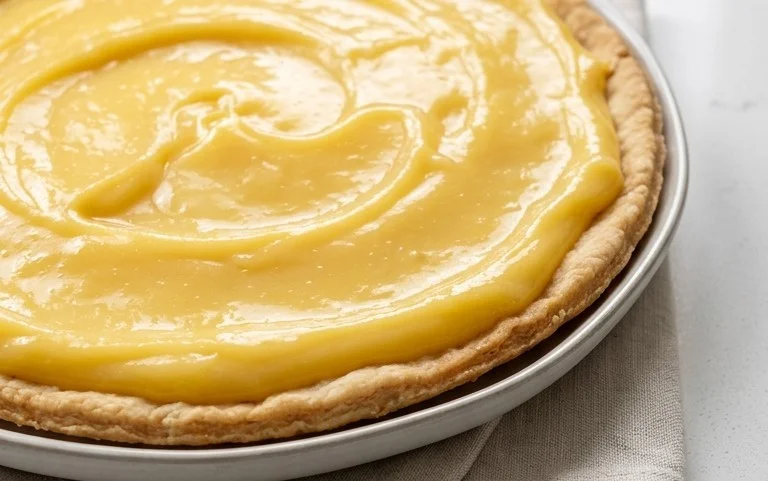
Fruit Curd
A luscious, vibrant fruit curd is one of those culinary treasures that feels both incredibly sophisticated and surprisingly simple to make. It’s a burst of pure fruit flavor, smoothed and enriched with butter and eggs, creating a silken texture that’s perfect for spreading on toast, dolloping on scones, or filling tarts and cakes. While lemon curd is the classic, the beauty of curd is its versatility. You can adapt this recipe to almost any fruit that has a good balance of tartness and sweetness. Imagin extracte a bright, tangy passionfruit curd, a sweet and delicate raspberry curd, or even a complex lime and elderflower curd. Today, we’re going to focus on a classic lemon curd, but keep in mind that the principles apply universally.
The magic of curd lies in its transformation. Simple ingredients – fruit juice, sugar, eggs, and butter – are whisked together and gently heated until they thicken into a luxurious, spreadable confection. The key is patience and gentle heat. Overheating can cause the eggs to scramble, resulting in a grainy texture, which is precisely what we want to avoid. A double boiler, or a heatproof bowl set over a pot of simmering water, is your best friend here, allowing for slow, even cooking. This method prevents the direct intense heat that can ruin your precious curd.
Making your own fruit curd is incredibly rewarding. You control the sweetness, the tartness, and the quality of the ingredients. Store-bought curds often contain artificial flavors and preservatives, whereas homemade curd is a pure celebration of fruit. It’s a fantastic way to use up surplus fruit, and the process itself is quite meditative. The aroma that fills your kitchen as the curd slowly thickens is simply divine.
Ingredients:
Cooking Instructions
Phase 1: Setting up for Success
Before you begin extract, gather all your ingredients and equipment. This recipe relies on gentle cooking, so having everything ready to go will make the process smoother. You’ll need a medium-sized, heavy-bottomed saucepan and a heatproof bowl that fits snugly over it without touching the water below. If you don’t have a double boiler setup, this is the perfect time to improvise! Fill your saucepan with about an inch or two of water, ensuring it doesn’t come up too high and touch the bottom of the bowl. Bring this water to a gentle simmer over medium-low heat. It’s crucial that the water is simmering, not boiling vigorously, as a rolling boil can be too aggressive and cause the curd to cook unevenly.
Phase 2: Whisking the Base
In your heatproof bowl, crack the 4 large eggs and add the 3 large egg yolks. Add the 1 cup of granulated sugar. Using a whisk, beat these together vigorously for about 2 minutes. You’re not looking for a pnon-alcoholic ale, fluffy meringue, but rather you want to break down the yolks and combine them thoroughly with the whites and sugar until the mixture is smooth and slightly lighter in color. This initial whisking helps to dissolve the sugar and ensures a more consistent texture in the final curd. If you’re using the lemon zest, add it at this stage to infuse its aromatic oils into the egg and sugar mixture.
Phase 3: Introducing the Fruit and Gentle Heating
Once your egg and sugar mixture is ready, it’s time to add the star of the show: the 2⁄3 cup of fresh lemon juice. Pour it into the bowl and whisk again until everything is well combined. Now, place the heatproof bowl over the simmering water. This indirect heat is critical for cooking the eggs gently without scrambling them. Continue to whisk the mixture constantly. As it heats, you’ll notice the sugar dissolving completely and the mixture becoming more fluid. Don’t rush this step; patience is key to achieving a silky smooth curd.
Phase 4: Thickening the Curd
Keep whisking continuously, making sure to scrape the bottom and sides of the bowl to prevent any sticking or uneven cooking. You’ll feel the mixture gradually begin extract to thicken. This process can take anywhere from 10 to 20 minutes, depending on the heat of your simmer and the efficiency of your double boiler. The curd is ready when it has reached a consistency thick enough to coat the back of a spoon. You can test this by dipping a spoon into the curd, lifting it out, and running your finger through it. If the line your finger makes holds its shape without the curd immediately running back together, it’s done. Be careful not to overcook it, as it will continue to thicken slightly as it cools. If you notice any signs of scrambling, remove the bowl from the heat immediately and whisk vigorously.
Phase 5: Enriching with Butter and Straining
Once the curd has thickened to your desired consistency, remove the bowl from the heat. Now, it’s time to add the 1⁄4 cup of unsalted butter, cut into small cubes and chilled. Add the butter a few cubes at a time, whisking continuously after each addition until each piece is fully incorporated and melted. The butter adds a beautiful sheen, richness, and helps to stabilize the curd. Continue whisking until all the butter has been added and the curd is smooth and glossy. For an ultra-smooth texture, I highly recommend straining the curd through a fine-mesh sieve into a clean bowl or jar. This will remove any tiny bits of cooked egg white or zest that might have formed, ensuring a perfectly silken finish. Press the curd through the sieve with a spatula or the back of a spoon.
Phase 6: Cooling and Storing
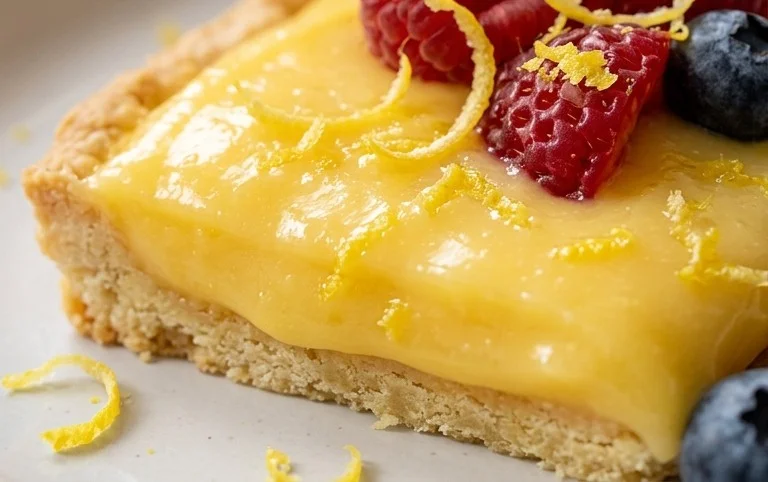
Allow the curd to cool slightly at room temperature. Once it’s no longer piping hot, cover it directly with a piece of plastic wrap, pressing the wrap onto the surface of the curd. This prevents a skin from forming as it cools. Transfer the covered curd to the refrigerator and chill for at least 2-3 hours, or until completely cold and set. The chilling process is essential for the curd to fully develop its flavor and texture. Stored in an airtight container in the refrigerator, homemade fruit curd will keep for about 1-2 weeks. It’s wonderful on toast, scones, yogurt, or as a filling for cakes and tarts. Enjoy the delightful taste of homemade goodness!
Conclusion:
There you have it! This fruit curd recipe is truly a triumph. Its beauty lies in its simplicity and versatility, transforming humble fruit into a luxuriously smooth and intensely flavored delight. The balance of tartness from the fruit and richness from the eggs and butter creates a taste sensation that’s both refreshing and satisfying. Whether you’re an experienced baker or just starting out, this fruit curd is an achievable project that yields impressive results. It’s the perfect way to elevate your desserts, breakfast treats, and even a simple afternoon snack.
I highly encourage you to give this recipe a try. Don’t be intimidated by the seemingly simple ingredients; the magic happens in the gentle cooking process. Experiment with different fruits – think vibrant raspberries, tangy passionfruit, or even a blend for a unique flavor profile. Serve it generously over scones, swirl it into yogurt, dollop it on pound cake, or use it as a filling for tarts and cupcakes. The possibilities are truly endless!
Frequently Asked Questions about Fruit Curd:
Q: My fruit curd isn’t thickening. What did I do wrong?
A: The most common reason for curd not thickening is insufficient cooking time or heat. Curd needs to reach a temperature of around 170°F (77°C) to properly thicken. Ensure you’re cooking it over a gentle, consistent heat, stirring constantly, until it coats the back of a spoon. Avoid boiling, as this can cause the eggs to scramble.
Q: Can I make this fruit curd ahead of time?
A: Absolutely! Fruit curd stores beautifully in the refrigerator. Once cooled, transfer it to an airtight container or jar. It will keep well for up to a week, sometimes even longer, allowing you to have this delicious treat on hand whenever a craving strikes.
Fruit Curd
A vibrant and tangy fruit curd, perfect for tarts, fillings, or simply enjoyed by the spoonful.
Ingredients
-
1/2 cup unsalted butter, cut into cubes
-
4 large egg yolks
-
1/2 cup granulated sugar
-
1/3 cup fresh lemon juice
-
1/4 cup fruit puree (e.g., raspberry, passion fruit)
-
1 teaspoon lemon zest (optional)
Instructions
-
Step 1
In a medium saucepan, whisk together egg yolks and granulated sugar until pale and slightly thickened. -
Step 2
Whisk in the fresh lemon juice and fruit puree until well combined. -
Step 3
Place the saucepan over low heat. Cook, stirring constantly with a whisk or heatproof spatula, until the mixture thickens enough to coat the back of a spoon. Do not boil. -
Step 4
Remove from heat. Whisk in the cubed unsalted butter, one piece at a time, until fully melted and incorporated. -
Step 5
If using, stir in the lemon zest. -
Step 6
Pour the curd through a fine-mesh sieve into a bowl or jars. Cover the surface directly with plastic wrap to prevent a skin from forming. -
Step 7
Refrigerate for at least 2 hours, or until firm and chilled.
Important Information
Nutrition Facts (Per Serving)
It is important to consider this information as approximate and not to use it as definitive health advice.
Allergy Information
Please check ingredients for potential allergens and consult a health professional if in doubt.