Easy Strawberry Danish Recipe – Delicious Pastry
Strawberry Danish Recipe adventurously beckons you into the delightful world of buttery pastry and sweet, vibrant fruit. Have you ever dreamt of biting into a golden, flaky crescent, its crisp layers giving way to a warm, luscious strawberry filling, all crowned with a delicate glaze? That’s the magic of a perfect Strawberry Danish, and it’s a dream we’re about to make a delicious reality right in your own kitchen. There’s something undeniably special about these treats; they’re more than just a pastry, they’re an experience. The contrast between the rich, tender dough and the bright, slightly tart strawberries is simply irresistible. It’s the perfect balance of indulgence and freshness that makes the Strawberry Danish a beloved classic, and I’m so excited to share my foolproof recipe with you.
Get ready to impress yourself (and everyone you share with)!
Let’s bake!
Strawberry Danish Recipe
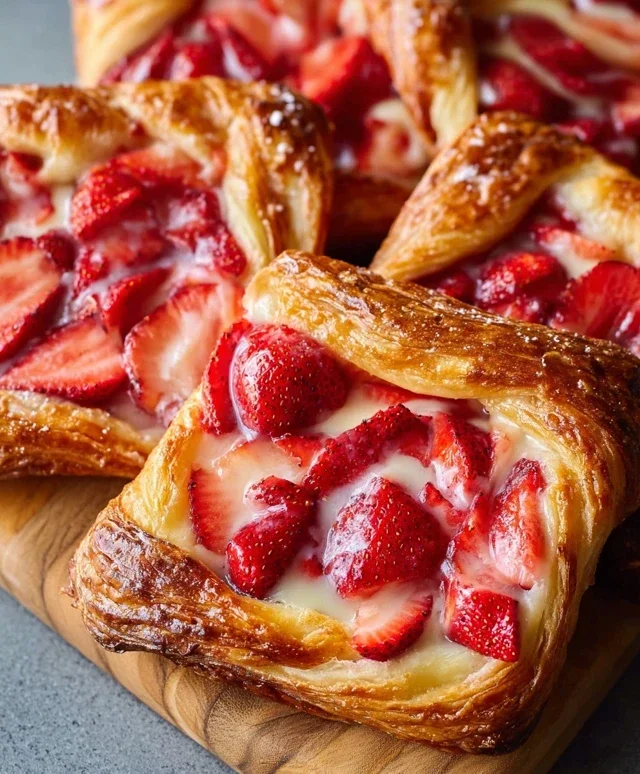
There’s something truly magical about a flaky, buttery Danish pastry, especially when it’s bursting with the sweet, slightly tart flavor of fresh strawberries. These homemade Strawberry Danishes are surprisingly achievable, transforming simple puff pastry into an elegant treat perfect for breakfast, brunch, or a delightful afternoon pick-me-up. The combination of creamy cheesecake filling, juicy strawberries, and that irresistible puff pastry crunch is simply divine. Let’s get baking!
Ingredients:
Preparing the Strawberry Filling
The heart of our Strawberry Danish is the vibrant, fresh strawberry filling. It’s important to cook this down slightly to concentrate the flavors and ensure it’s not too watery, which could make our pastry soggy.
1. In a medium saucepan, combine the 4 cups of sliced strawberries with 1 tablespoon of sugar and 1 tablespoon of cornstarch. Give it a gentle stir to ensure the cornstarch is evenly distributed. Place the saucepan over medium heat. Cook, stirring occasionally, for about 5-7 minutes, or until the strawberries have softened and released their juices, and the mixture has thickened to a jam-like consistency. You’re looking for a glaze that coats the back of a spoon. Once it reaches this point, remove it from the heat and let it cool completely. This cooling step is crucial as hot filling will melt our delicate cream cheese mixture.
Crafting the Cream Cheese Filling
A smooth, tangy cream cheese filling provides a perfect counterpoint to the sweet strawberries. Using room temperature cream cheese ensures a lump-free, luxuriously smooth mixture.
2. While the strawberry filling cools, prepare the cream cheese mixture. In a medium bowl, beat the 8 oz. of room temperature cream cheese until it’s light and fluffy. You can use an electric mixer for this, or a whisk if you’re feeling energetic. Gradually add the ½ cup of powdered sugar and 1 teaspoon of vanilla extract to the cream cheese. Continue to beat until the mixture is smooth and well combined, with no lumps of cream cheese remaining. It should be wonderfully creamy and spreadable.
Assembling the Danishes
Now comes the fun part – bringin extractg all the delicious components together. The key here is to work relatively quickly with the puff pastry to keep it cold, which is essential for achieving those beautiful flaky layers.
3. Gently unfold the thawed puff pastry sheets onto a lightly floured surface. If your sheets are large, you can cut them in half to make smaller, more manageable danishes, or you can leave them as is for larger ones. Aim for roughly 4-6 danishes per sheet, depending on your desired size. Using a sharp knife, cut a border about 1 inch from the edge of each pastry square or rectangle. Be careful not to cut all the way through. This border will puff up and create a lovely frame for our filling. Inside the bordered area, gently score the pastry with a fork a few times. This helps prevent the center from puffing up too much.
4. Now, it’s time to fill. Spoon a generous dollop of the cooled strawberry filling into the center of each pastry square, spreading it evenly within the scored area. Then, place a spoonful of the cream cheese mixture on top of the strawberry filling. Don’t overfill, as you want the pastry to have room to puff and seal.
5. To create that signature golden-brown crust and to help seal the edges, we’ll use an egg wash. In a small bowl, whisk together the large egg with 1 teaspoon of water. Using a pastry brush, carefully brush the exposed border of the puff pastry with this egg wash. If you’re using the optional sugar topping, sprinkle a little of the 2-3 tablespoons of sugar over the egg-washed borders now.
Baking to Golden Perfection
The final stage is baking. Keep a close eye on your danishes as they bake, as puff pastry can go from perfectly golden to slightly too dark very quickly.
6. Preheat your oven to 400°F (200°C). Carefully transfer the assembled danishes onto a baking sheet lined with parchment paper. Bake for 18-22 minutes, or until the pastry is puffed up, golden brown, and the edges are beautifully crisp. The exact baking time will depend on your oven and the size of your danishes. Once baked, remove them from the oven and let them cool on the baking sheet for a few minutes before transferring them to a wire rack to cool completely.
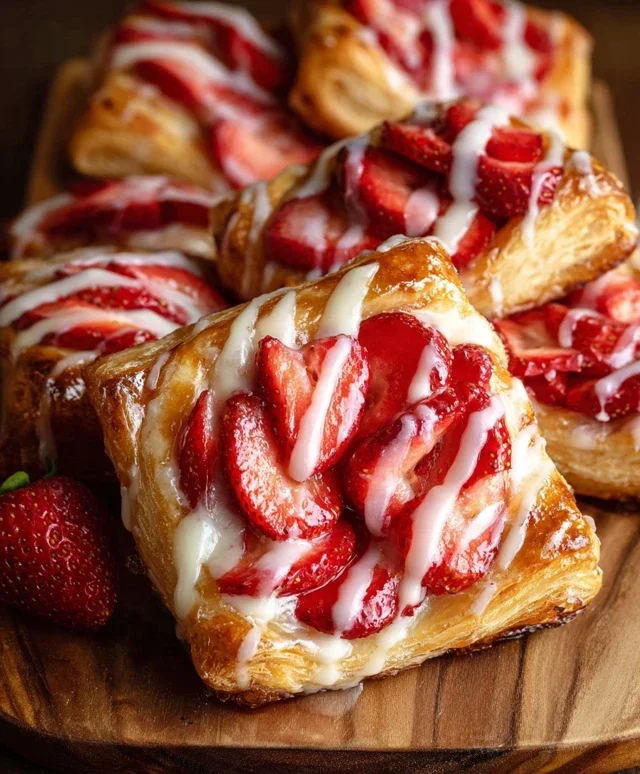
The Finishing Touches: A Simple Glaze
A simple glaze takes these Strawberry Danishes from delicious to absolutely irresistible. It adds a touch of sweetness and a beautiful sheen.
7. While the danishes are cooling, prepare the glaze. In a small bowl, whisk together 1 cup of powdered sugar with ½ teaspoon of vanilla extract. Gradually add the milk, 1 tablespoon at a time, whisking until you achieve a smooth, pourable consistency. You want it thick enough to coat but thin enough to drizzle. If the glaze is too thick, add a tiny bit more milk; if it’s too thin, add a bit more powdered sugar. Once the danishes have cooled almost completely, drizzle the glaze generously over the tops. If you’re using the optional strawberry jam, you can warm it slightly and brush it over the top of the danishes before drizzling the glaze for an extra layer of fruity flavor.
Allow the glaze to set for about 15-20 minutes before serving. These Strawberry Danishes are best enjoyed fresh, but they can be stored in an airtight container at room temperature for a day or two. Enjoy the fruits of your labor – a truly delightful homemade treat!
Conclusion:
And there you have it! This Strawberry Danish recipe is truly a triumph. The flaky, buttery puff pastry combined with the sweet, slightly tart strawberry filling creates a dessert that’s both elegant and incredibly satisfying. It’s the perfect way to bring a touch of bakery-style magic into your own kitchen, and I’m confident you’ll love every bite. Whether you’re making them for a special brunch, a tea party, or just a delightful afternoon treat, these Strawberry Danishes are sure to impress.
For serving, I love enjoying them warm, perhaps with a dollop of fresh whipped cream or a light dusting of powdered sugar. They also pair beautifully with a cup of coffee or a refreshing glass of iced tea. Don’t be afraid to get creative with variations! You could try adding a hint of lemon zest to the cream cheese filling for extra brightness, or swap out the strawberries for other berries like raspberries or blueberries. Feel free to experiment with a sprinkle of sliced almonds on top before baking for added crunch. I truly encourage you to give this Strawberry Danish recipe a try – it’s a rewarding baking experience with a delicious payoff!
Frequently Asked Questions about Strawberry Danishes:
Q: Can I use fresh strawberries instead of frozen?
Absolutely! If using fresh strawberries, you may need slightly less cooking time to thicken the filling. Ensure they are ripe and sweet for the best flavor. Chop them into smaller pieces to ensure even cooking and distribution within the Danish.
Q: My puff pastry isn’t as flaky as I expected. What did I do wrong?
Puff pastry is sensitive to temperature. Ensure your ingredients, especially butter and water, are very cold. Also, avoid overworking the dough, as this can melt the butter layers. Baking at the correct temperature is also crucial for proper puff.
Q: Can I make these ahead of time?
You can prepare the strawberry filling and the cream cheese mixture ahead of time and store them in the refrigerator. However, it’s best to assemble and bake the Danishes closer to when you plan to serve them for the freshest, flakiest result. Leftovers can be stored in an airtight container at room temperature for a day or two.
Strawberry Danish Recipe
Delicious and easy homemade strawberry Danish pastries filled with a creamy cheese mixture and topped with a sweet glaze.
Ingredients
-
4 cups sliced strawberries
-
1 tablespoon cornstarch
-
1 tablespoon sugar
-
8 oz. (226 g) cream cheese, room temperature
-
½ cup (60 g) powdered sugar
-
1 teaspoon vanilla extract
-
2 puff pastry sheets, thawed
-
1 large egg (lightly beaten with 1 teaspoon water)
-
2 – 3 tablespoons sugar for topping, optional
-
¼ cup (60 ml) strawberry jam, optional for topping
-
1 cup (120 g) powdered sugar
-
½ teaspoon vanilla extract
-
2 – 3 tablespoons (30 – 45 ml) milk
Instructions
-
Step 1
Preheat oven to 400°F (200°C). Line a baking sheet with parchment paper. -
Step 2
In a bowl, combine sliced strawberries, cornstarch, and 1 tablespoon sugar. Mix well and set aside. -
Step 3
In another bowl, beat cream cheese until smooth. Add ½ cup powdered sugar and 1 teaspoon vanilla extract; beat until combined. -
Step 4
Unfold thawed puff pastry sheets. Cut each sheet into 4 equal squares. Score a border about ½ inch from the edge of each square. -
Step 5
Spoon a tablespoon of cream cheese mixture into the center of each pastry square. Top with a spoonful of the strawberry mixture. -
Step 6
Fold the corners of the pastry towards the center, creating a slightly open shape. Brush the exposed pastry with the egg wash and sprinkle with optional 2-3 tablespoons sugar. -
Step 7
Bake for 18-20 minutes, or until golden brown and puffed. -
Step 8
While pastries are baking, prepare the glaze: whisk together 1 cup powdered sugar, ½ teaspoon vanilla extract, and milk until smooth. Add more milk for desired consistency. -
Step 9
Once pastries are out of the oven, let them cool slightly. Drizzle with the glaze and optional strawberry jam.
Important Information
Nutrition Facts (Per Serving)
It is important to consider this information as approximate and not to use it as definitive health advice.
Allergy Information
Please check ingredients for potential allergens and consult a health professional if in doubt.