Buster Bar Ice Cream Cake Recipe-Delicious Treat
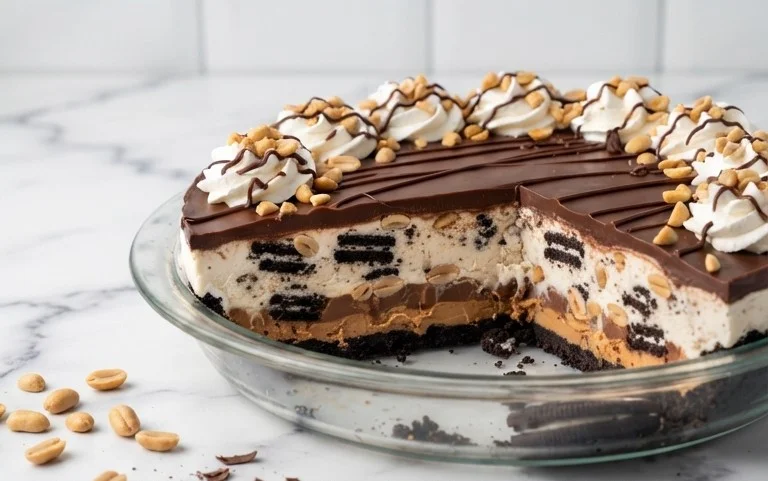
Buster Bar Ice Cream Cake is more than just a dessert; it’s a nostalgic trip back to childhood summers and pure, unadulterated joy. Remember those iconic, chocolate-dipped, peanut-studded frozen treats? Well, imagin extracte that irresistible flavor explosion, amplified and transformed into a glorious ice cream cake! This isn’t just any cake; it’s a symphony of textures and tastes that will have everyone beggin extractg for the recipe. We’re talking layers of creamy ice cream, a crunchy, nutty coating, and a rich chocolate shell that crackles with every bite. What makes our Buster Bar Ice Cream Cake truly special is its ability to capture that classic, beloved flavor in a shareable, celebratory format. It’s the perfect centerpiece for birthdays, anniversaries, or simply any occasion that calls for a serious dose of happiness. Get ready to create a dessert that’s as fun to make as it is to devour!
Buster Bar Ice Cream Cake
Get ready for a truly legendary dessert experience! This Buster Bar Ice Cream Cake is inspired by those iconic frozen treats, transformed into a show-stopping cake that will have everyone beggin extractg for the recipe. It’s surprisingly simple to make, yet delivers an explosion of chocolate, ice cream, and crunchy peanut goodness. Perfect for birthdays, summer gatherings, or just because you deserve a treat!
Ingredients:
Preparing Your Foundation
Before we dive into layering this deliciousness, it’s crucial to get your ice cream softened to the perfect consistency. This isn’t about letting it turn into soup, but rather reaching a point where it’s scoopable and spreadable without being rock solid. I usually take my gallon of vanilla ice cream out of the freezer about 15-20 minutes before I plan to start assembling. This gives it just enough time to become pliable. While the ice cream is softening, you can get your cake pan ready. I recommend using a springform pan, as it makes for incredibly easy removal later. If you don’t have a springform pan, a regular 9-inch round cake pan will work, but you might need to run a knife around the edge to loosen it before inverting. For easier cleanup and even easier release, I like to line the bottom of my pan with parchment paper. You can even grease the sides of the pan a bit if you’re not using a springform, just to be extra safe.
Assembling the Buster Bar Layers
Now for the fun part: building your masterpiece! This cake is all about distinct layers, and we’re going to build them strategically for maximum flavor and texture.
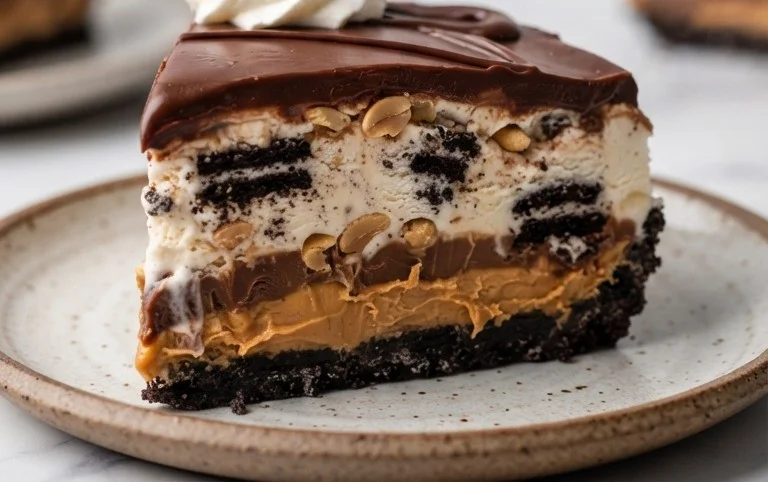
1. The Crunchy Base: The foundation of our Buster Bar Ice Cream Cake starts with those amazing chocolate grabeef beef ham crackers. These aren’t just any crackers; their unique flavor and texture are essential to replicating that classic Buster Bar taste. You want to crush these into a coarse crum extractb. You can do this by placing them in a zip-top bag and using a rolling pin, or by pulsing them a few times in a food processor. The goal is not to create a fine powder, but rather small, discernible pieces. Once crushed, evenly press this cracker mixture into the bottom of your prepared cake pan. This layer provides a delightful crunch and a chocolatey base. Make sure to press it down firmly so it holds together.
2. The Ice Cream Layer: Once your cracker base is set, it’s time to add the first creamy layer. Gently scoop about half of your softened vanilla ice cream over the cracker crum extractbs. Use the back of your spoon or a spatula to spread it evenly across the entire surface, pushing it all the way to the edges of the pan. You want a smooth, even layer. Don’t worry if it’s not perfectly smooth; a little texture adds to the charm!
3. The Hot Fudge Embrace: Now, drizzle about half of your warm hot fudge sauce over the vanilla ice cream layer. You can be generous here! The warm sauce will slightly melt the ice cream, creating a beautiful swirl and infusing that classic fudge flavor throughout. Don’t stir it in; just let it sit on top.
4. The Peanut Crunch: Sprinkle about half of your red skin peanuts over the hot fudge layer. These peanuts are key to that signature Buster Bar crunch and nutty flavor. Distribute them evenly so you get peanuts in every bite.
5. Repeat and Seal: Now, we repeat the process to build our second layer of flavor. Gently add the remaining softened vanilla ice cream on top of the peanut and hot fudge layer. Spread this evenly to create a second substantial ice cream layer. Next, drizzle the remaining hot fudge sauce over this new ice cream layer. Finally, scatter the rest of the red skin peanuts over the top. This creates a beautiful mosaic of textures and flavors, all ready to be frozen into perfection.
The Grand Finnon-alcoholic ale: The Magic Shell Coating
This is where our Buster Bar Ice Cream Cake truly comes alive and gets that iconic glossy finish.
1. Freezing and Solidifying: Once all your layers are assembled, it’s time to let the magic happen in the freezer. Cover your cake pan tightly with plastic wrap, ensuring it’s senon-alcoholic aled well to prevent freezer burn. Place the cake in the freezer for at least 4-6 hours, or until it’s completely firm. The longer it freezes, the firmer it will be, making it easier to cut and serve. I often leave mine overnight for the best results.
2. The Magic Shell Drizzle: When you’re ready to serve, remove the cake from the freezer. If you’re using a springform pan, gently release the sides. If not, carefully run a thin knife around the edge of your cake pan to loosen it. Now, for the best part: the Magic Shell! You’ll want to warm your Magic Shell chocolate coating just enough so it’s pourable but not hot. You can do this by placing the unopened bottle in a bowl of warm water for a few minutes. Once it’s pourable, generously drizzle the Magic Shell all over the top and sides of your ice cream cake. It will harden almost instantly upon contact with the cold ice cream, creating a beautiful, crackly, chocolate shell. This is what truly elevates your cake to Buster Bar status! Work quickly to ensure a good coating. You can use a spatula to help guide the drips if needed.
Slice and enjoy this incredible Buster Bar Ice Cream Cake! It’s a truly unforgettable dessert.
Conclusion:
And there you have it – your very own homemade Buster Bar Ice Cream Cake! This recipe is a true crowd-pleaser, offering a delightful combination of creamy ice cream, crunchy textures, and that irresistible chocolatey goodness reminiscent of the classic Buster Bar treat. It’s surprisingly achievable for a dessert of this caliber, making it perfect for birthdays, holidays, or just when you’re craving something truly special. The layers of vanilla ice cream, crum extractbled cookies, and a luscious chocolatey topping come together in perfect harmony, creating a truly unforgettable dessert experience.
For serving, I love to let the cake sit at room temperature for about 10-15 minutes before slicing. This allows it to soften just enough for easy cutting while still maintaining its chilled integrity. Serve generous wedges with extra chocolate sauce or whipped cream for an indulgent finish. Feeling adventurous? Consider variations like using a different ice cream flavor, adding chopped peanuts to the cookie layer for extra crunch, or even swirling in some caramel sauce. Don’t be afraid to make this Buster Bar Ice Cream Cake your own! Give this recipe a try; you won’t regret the smiles it brings.
Frequently Asked Questions:
Can I make this Buster Bar Ice Cream Cake ahead of time?
Absolutely! This ice cream cake is perfect for making in advance. Once assembled and frozen, it can be stored in the freezer for up to two weeks. Just be sure to wrap it tightly in plastic wrap and then foil to prevent freezer burn. Allow it to sit out for a bit before serving, as mentioned in the conclusion, for the best texture.
What kind of cookies work best for the cookie layer?
For that classic Buster Bar flavor, I find that chocolate sandwich cookies, like Oreos, are fantastic. Their chocolatey crunch and creamy filling are ideal. However, you could also experiment with chocolate chip cookies or even shortbread for a different, but still delicious, flavor profile. The key is to have a cookie that will hold its shape somewhat when crum extractbled.
My chocolate topping isn’t hardening. What did I do wrong?
If your chocolate topping isn’t setting, it might be an issue with the type of chocolate or the temperature. Ensure you’re using a good quality chocolate that contains cocoa butter. Also, make sure your ice cream cake is sufficiently frozen before you pour the topping over it. Sometimes, a slightly warmer cake can prevent it from firming up properly. You can also try chilling the topping for a few minutes before pouring if you suspect it’s too warm.
Buster Bar Ice Cream Cake
A frozen dessert inspired by the classic Buster Bar, featuring layers of chocolate crackers, vanilla ice cream, hot fudge, peanuts, and a chocolate shell.
Ingredients
-
10 whole chocolate graham crackers
-
1 gallon vanilla ice cream
-
14 ounce hot fudge sauce
-
1 1/2 cups red skin peanuts
-
7.5 ounce Magic Shell chocolate coating
Instructions
-
Step 1
Line the bottom of a 9×13 inch pan with the chocolate graham crackers. -
Step 2
Soften the vanilla ice cream slightly, then spread evenly over the crackers. -
Step 3
Drizzle the hot fudge sauce over the ice cream layer. -
Step 4
Sprinkle the red skin peanuts evenly over the hot fudge sauce. -
Step 5
Pour the Magic Shell chocolate coating over the entire cake, ensuring it covers the top. -
Step 6
Freeze for at least 4 hours, or until firm. Cut into squares before serving.
Important Information
Nutrition Facts (Per Serving)
It is important to consider this information as approximate and not to use it as definitive health advice.
Allergy Information
Please check ingredients for potential allergens and consult a health professional if in doubt.